Arista Guardian for Network Identity (AGNI) is one of the Cloud-Native solutions which provides Identity based Access Control. This cloud based server uses Primarily RadSec for communication with the Authentication devices like WiFi APs (Access Points) and Switches. In this blog I try to explain how we can set up WiFi UPSK (Unique Pre-Shared Key) authentication along with Arista APs and AGNI. Since the server is on the Cloud; Cloud-native advantages inherently apply to AGNI and plus, being on cloud reduces the server administration overhead.
- UPSK
- Scenario
- UPSK WorkFlow
- UPSK Cracking and its Workflow
- Known UPSK Client Workflow
- AGNI Configuration for OneLogin IDP
- RadSec Communication
- CV-CUE Configuration
- Configure AGNI Server to do UPSK
- Testing
UPSK
Before we move to the actual configuration details of setting the configurations, etc, let me include some information about UPSK as well. UPSK Stands for Unique Pre-Shared Key. As the name suggests, each user/identity can have its own unique PSK. The PSK is tagged to identity/user and the same can be used to authenticate the devices that are trying to get on to the WiFi network. This would specifically mean that a user with a device can have its own specific PSK To connect to the WiFi network. And again, this PSK will be different from other Users who will have their own specific PSK.
Scenario
Consider a scenario where we expect Employees to bring their personal devices in the office which would want to get on the WiFi network. Generally referred to as BYOD devices. Office IT OR WiFi administrators dont manage these WiFi devices and hence providing them common access similar to registered WiFi devices (like laptops) provided by Company may not be a good option. Common PSK for all the devices may not be a good solution here as the PSK needs to be rotated frequently and can be leaked anytime as multiple users have access to the same. Also, most of the infrastructure is moving to EAP-TLS WiFi Authentication (using digital certificates) leaving behind the old ways of EAP-PEAP where user-names and passwords were used and their related shortcomings. Considering the above, one of the secure and reliable ways to actually provide accessibility to BYOD would be to use UPSK.
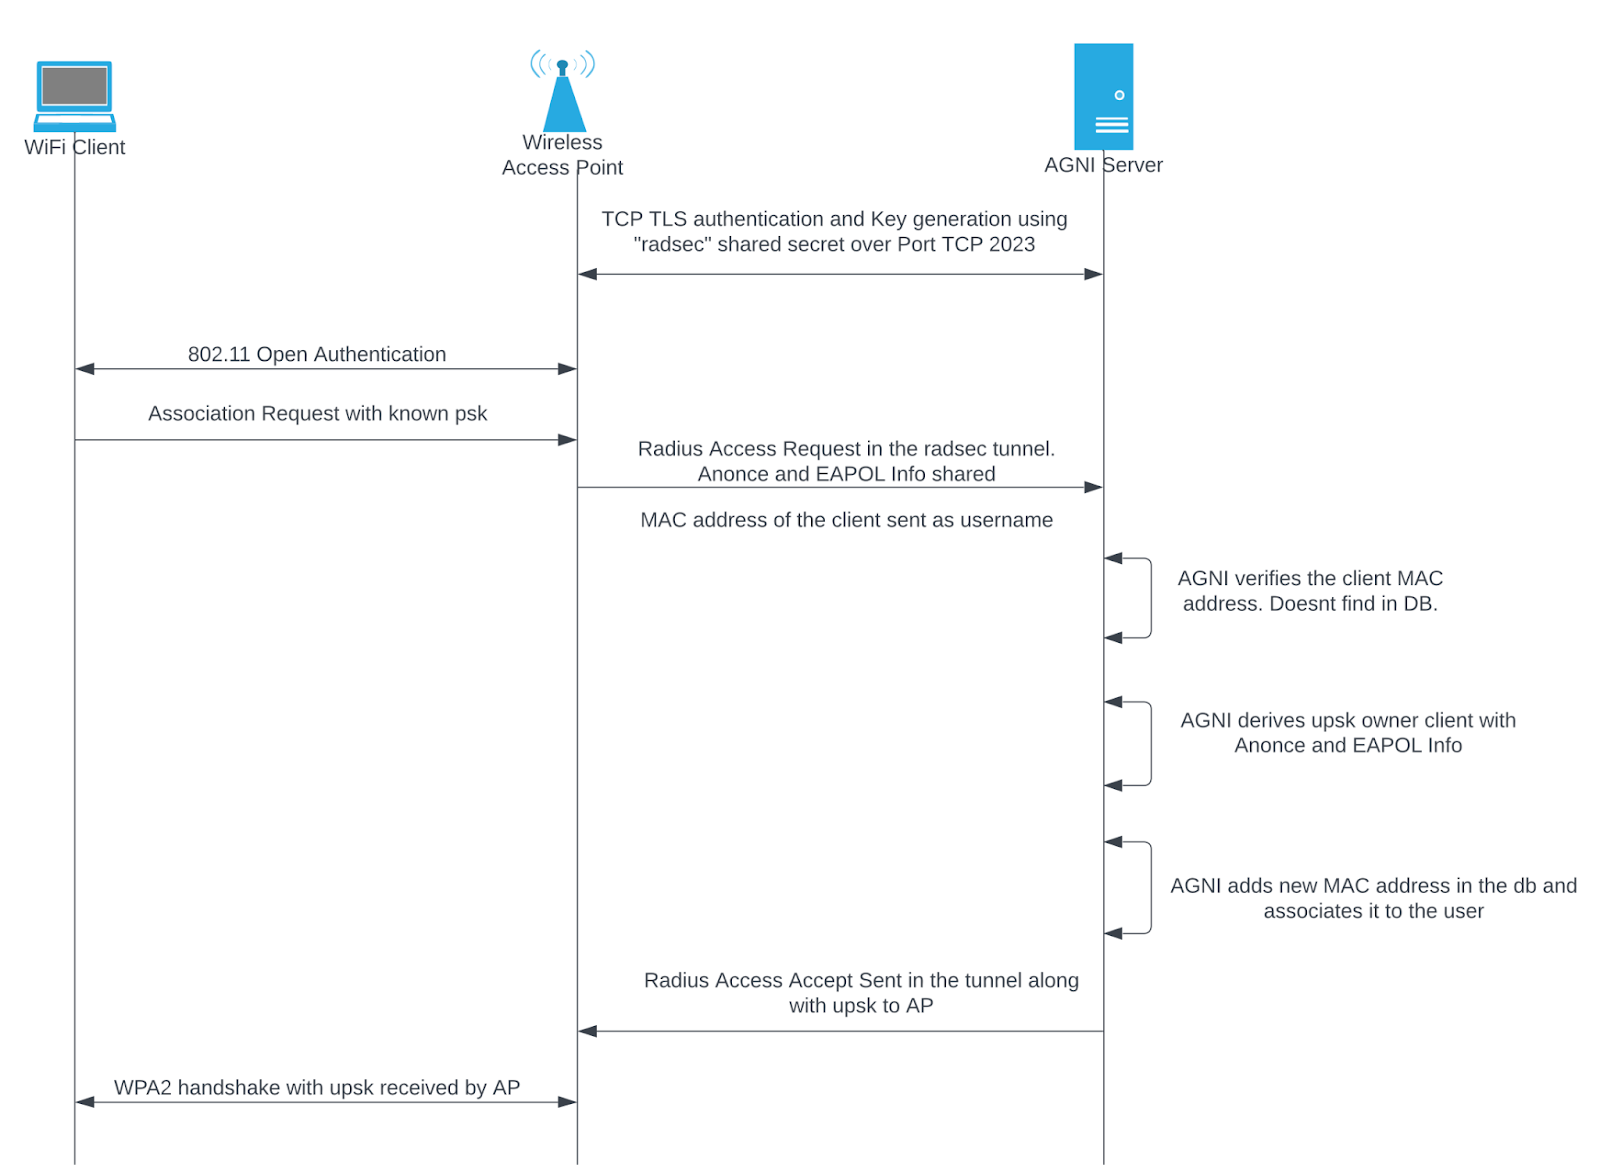
UPSK WorkFlow
This workflow applies to all the users and their devices who are trying to register their devices for the very first time.

UPSK Cracking and its Workflow
A single user may have more than one device which it would try to bring up to the WiFi network and following the same process as shown above may become sometimes a bit cumbersome. It’s not like it won’t work, but there is a shortcut, specifically if the device is doing WPA2 only (this does not work with WPA3. For WPA3 users the above general workflow is best suitable). The user’s PSK is eventually going to be the same for all the devices that it tries to connect. So instead of registering each device as per the above workflow, the user can connect to the SSID using the same PSK it received for the first device. The UPSK cracking feature helps to identify the PSK tagged to the specific user and allows the user to connect if the PSK is correct. Here is the workflow for UPSK Cracking:
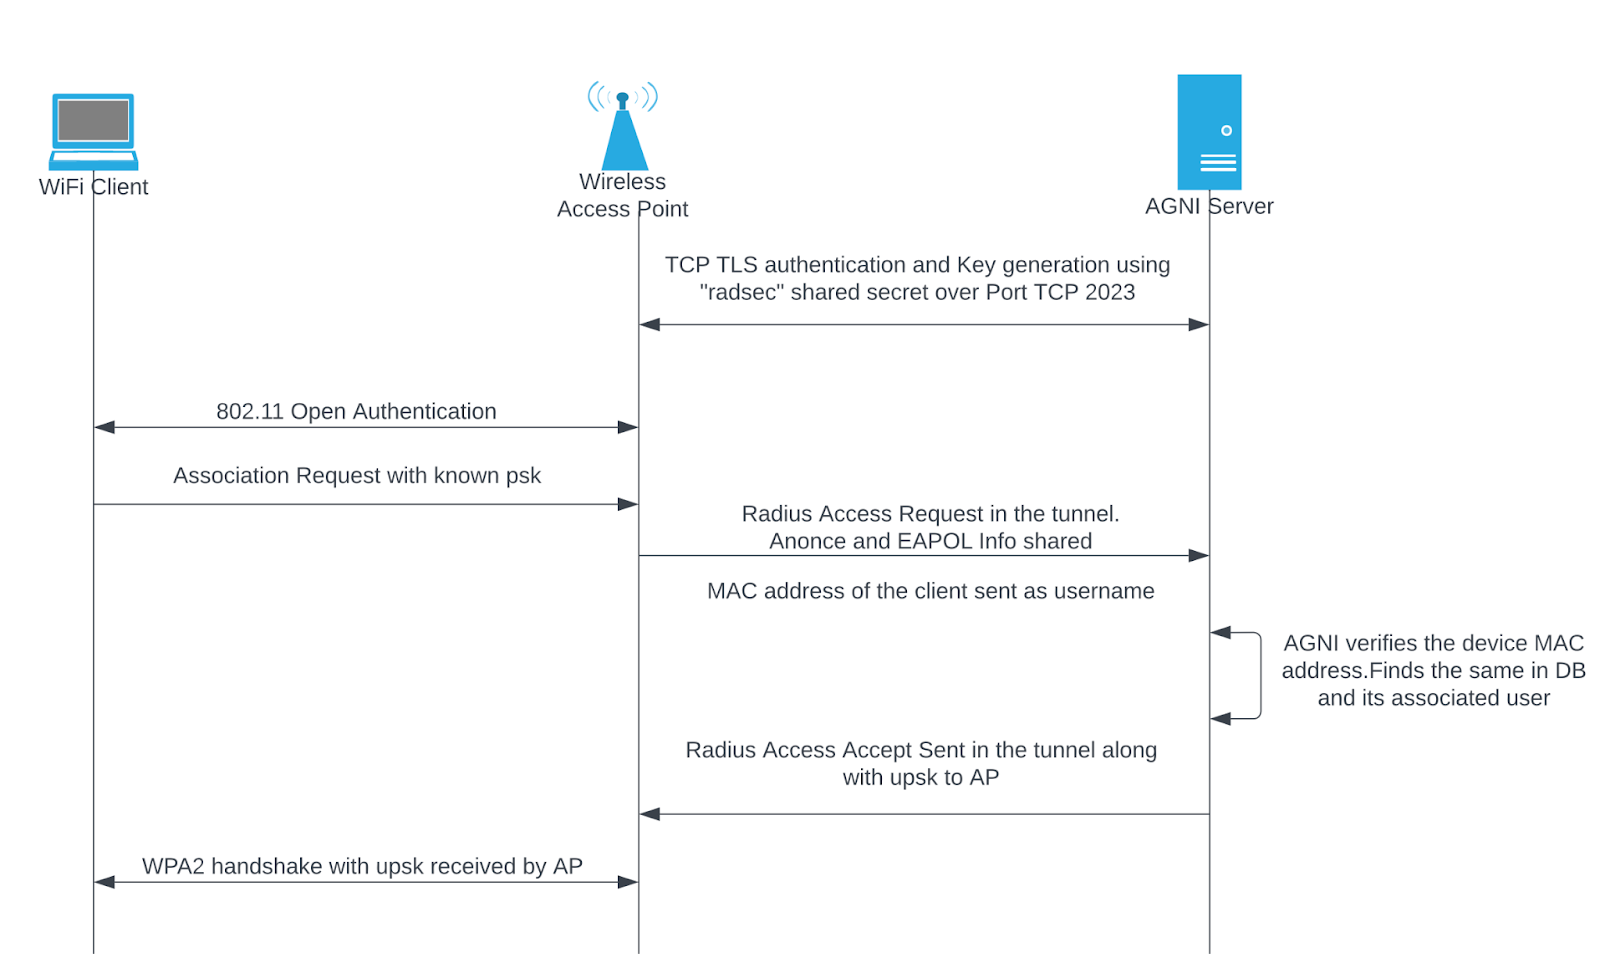
Known UPSK Client Workflow
Eventually once the client is connected to the SSID using its own PSK, it need not follow the same registration process every time it connects. The workflow for the same will be:
One more thing that we need to take care of is the Identity Provider configuration. AGNI does provide its own database for setting up users/identities; however a company with many users, AGNI’s own internal user database may not scale. AGNI can use the existing Identity Provider used by the Company. In this case, I have taken the example of OneLogin.
AGNI Configuration for OneLogin IDP
For this, you will require an OIDC client ID and OIDC Issuer URL. The Call back URL for the OneLogin configuration for AGNI as App will be generated after entering the Client ID and OIDC issuer URL.
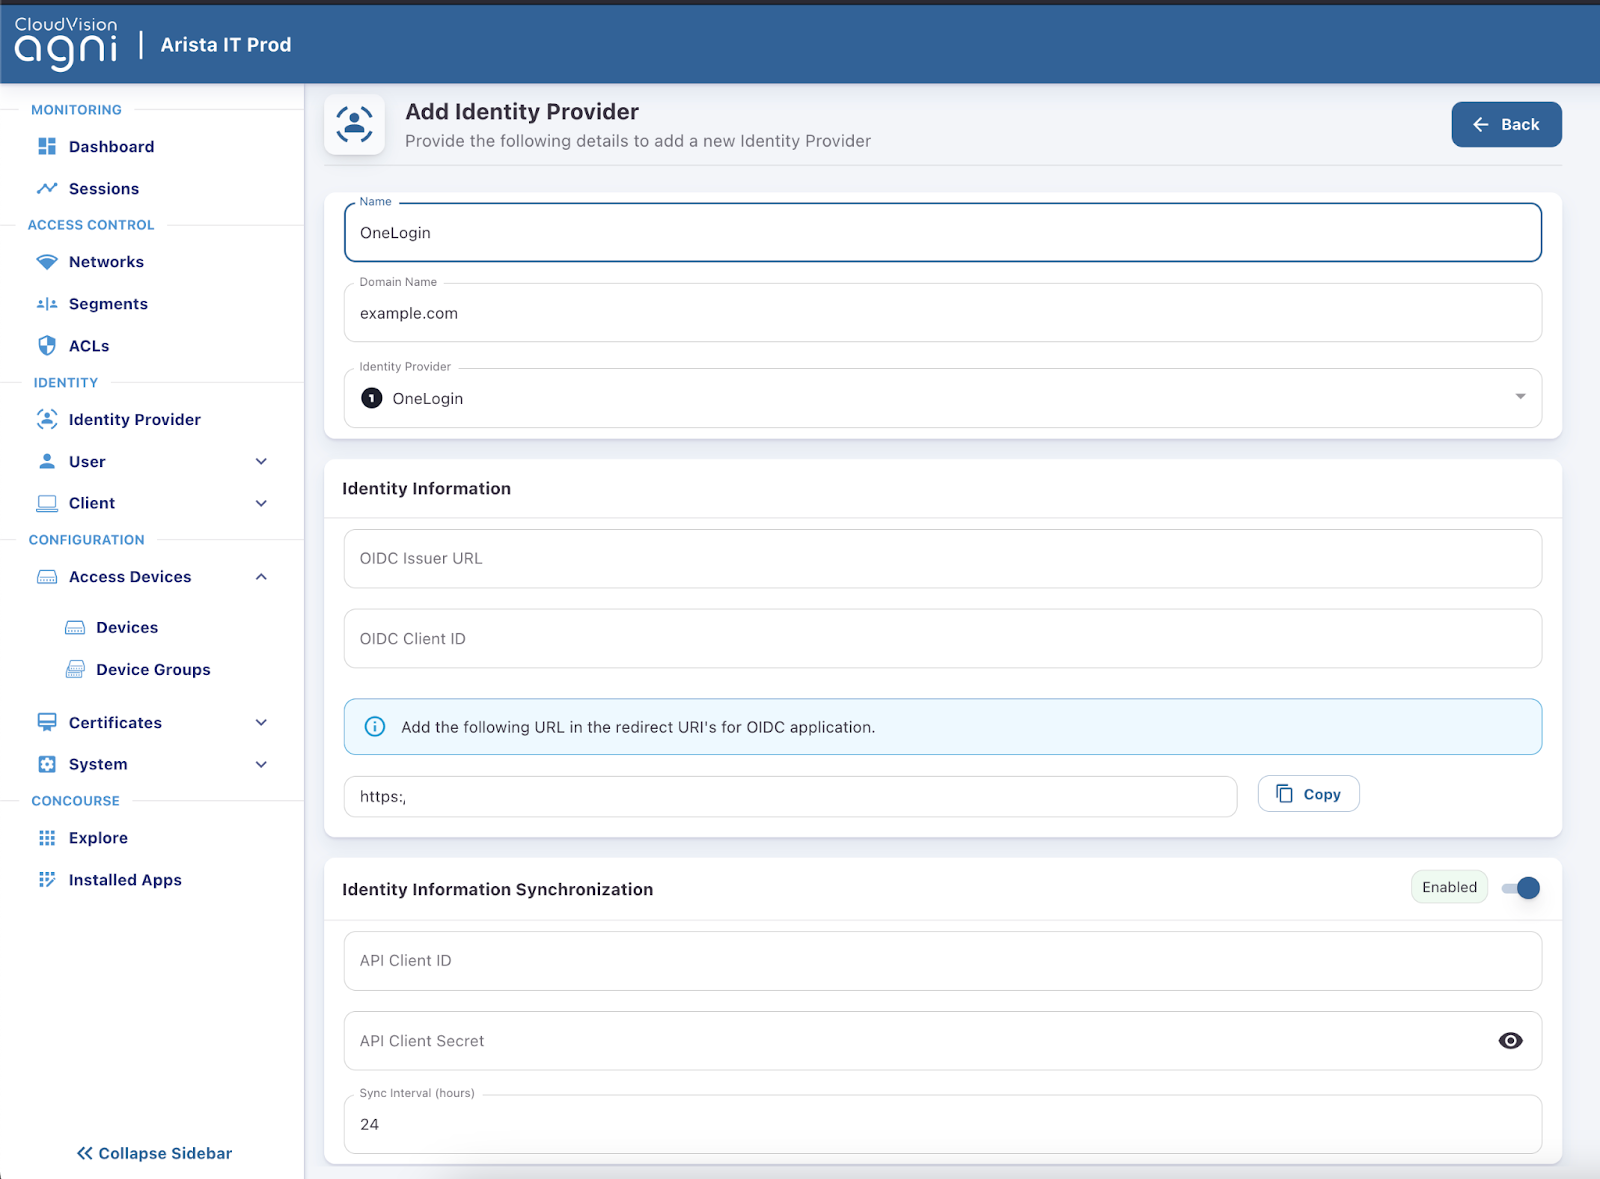
Identity information synchronization needs to be enabled to get the Users, Groups, User Status, etc from the OneLogin. For the same, an RO API would suffice. Sync intervals can be adjusted as required. By default all the Disabled Status Users will fail Authentication. Once configured, the IDP connection can be verified by fetching the user details from OneLogin via AGNI:

This window is available after successful connection with the IDP as per the above settings.
RadSec Communication
Now that we have AGNI set up to communicate with our preferred IDP, we need to understand how RadSec works. In general, it is Radius over TLS connection. This would mean that the Radius Communication happens over the TLS tunnel. TLS forms a secure connection by authenticating both the Sides Client and Server. The Authentication usually takes place via Digital Certificates. So obviously the AP and AGNI server needs to authenticate each other with Valid Digital Certificates. How Client Server forms TLS communication using Digital Certificates is beyond the scope of this blog. However, in order to form a successful Radsec tunnel, AP and AGNI need valid certificates and both should authenticate each other.
A lot of Arista APs come with a TPM Module with a built-in Certificate in it. AGNI by default is set up to accept this certificate when the AP acting as a RadSec Client tries to initiate a RadSec Connection using the certificate from TPM. Also, we can add the Root CA of AGNI in the RadSec Profile (discussed later) for AP to authenticate AGNI. For other APs (802.11ax based) which doesnt come up with TPM can use this nice article to setup Certificates on APs. If you are using a different CA already, the signing of the Certificates can be replaced by your CA; however the process would most likely remain the same from the CV-CUE front.
Note that the shared secret used for Radsec communication is always set to “radsec”. Make sure the AP’s radius profile is set to the same in the CV-CUE configuration.
CV-CUE Configuration
Lets start configuring CV-CUE to bring up an SSID which does UPSK against AGNI:
- Configure Radius Profile based on the certificates uploaded to the AP. Navigate to Configuration > Network Profiles > Radius > Add Server. Certificate tag names with DEFAULT are the TPM Module on the AP. ECC and RSA are the types of certificates that can be used.
- Select the Appropriate Certificate tag and add the CA certificate of AGNI so that the AP can use the same to authenticate AGNI server at the time of RadSec communication.
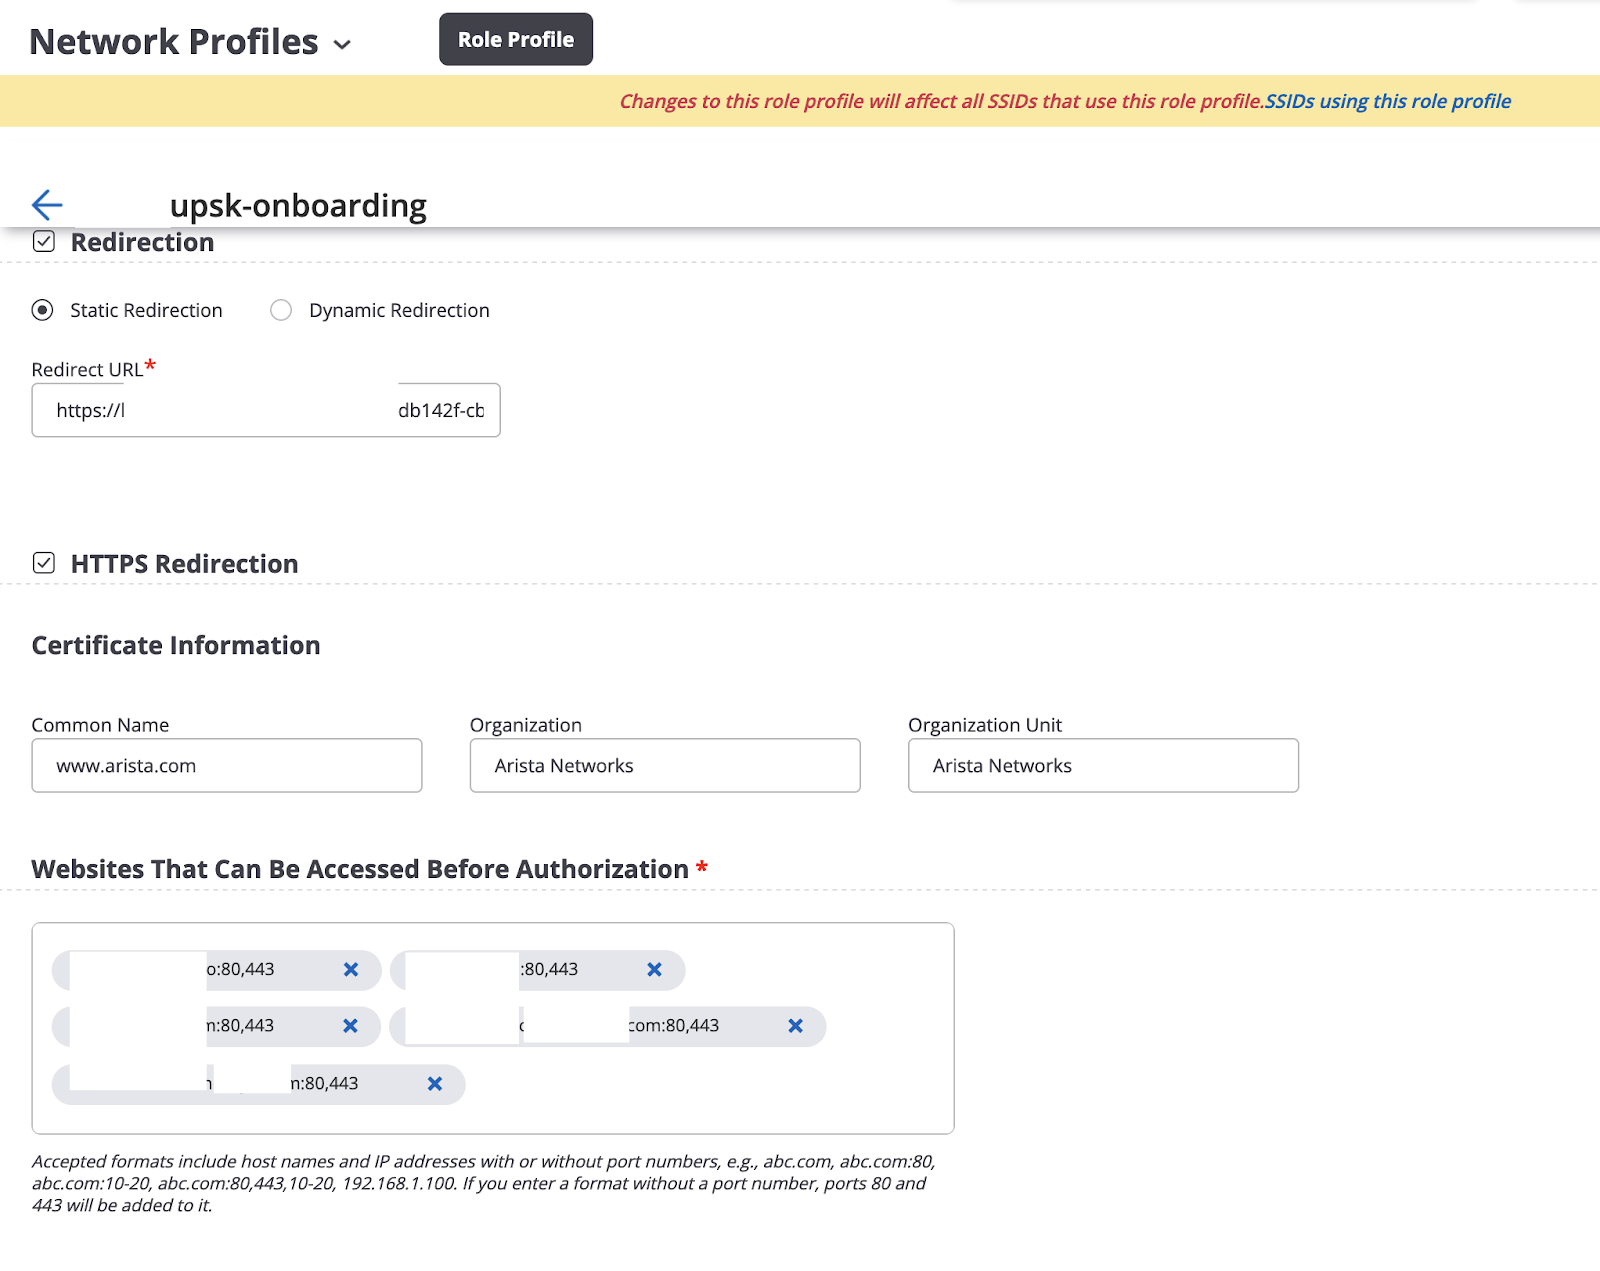
- Navigate to Configuration > Network Profiles > Role Profile > Edit the Role created earlier > Enable Redirection. This will act as Captive Portal Redirection for the upsk users to register themselves. This will be hosted on the ANGI server.
- Enable Redirection and mention the URL generated when creating the Network Policy in AGNI. In Websites that can be allowed before Authorization, specify the sites which will allow communication for Device Registration with AGNI. We can find these websites list after configuring Network Policy in AGNI.
- Configure SSID. Navigate to the relevant location. Configure > WiFi > Add SSID.
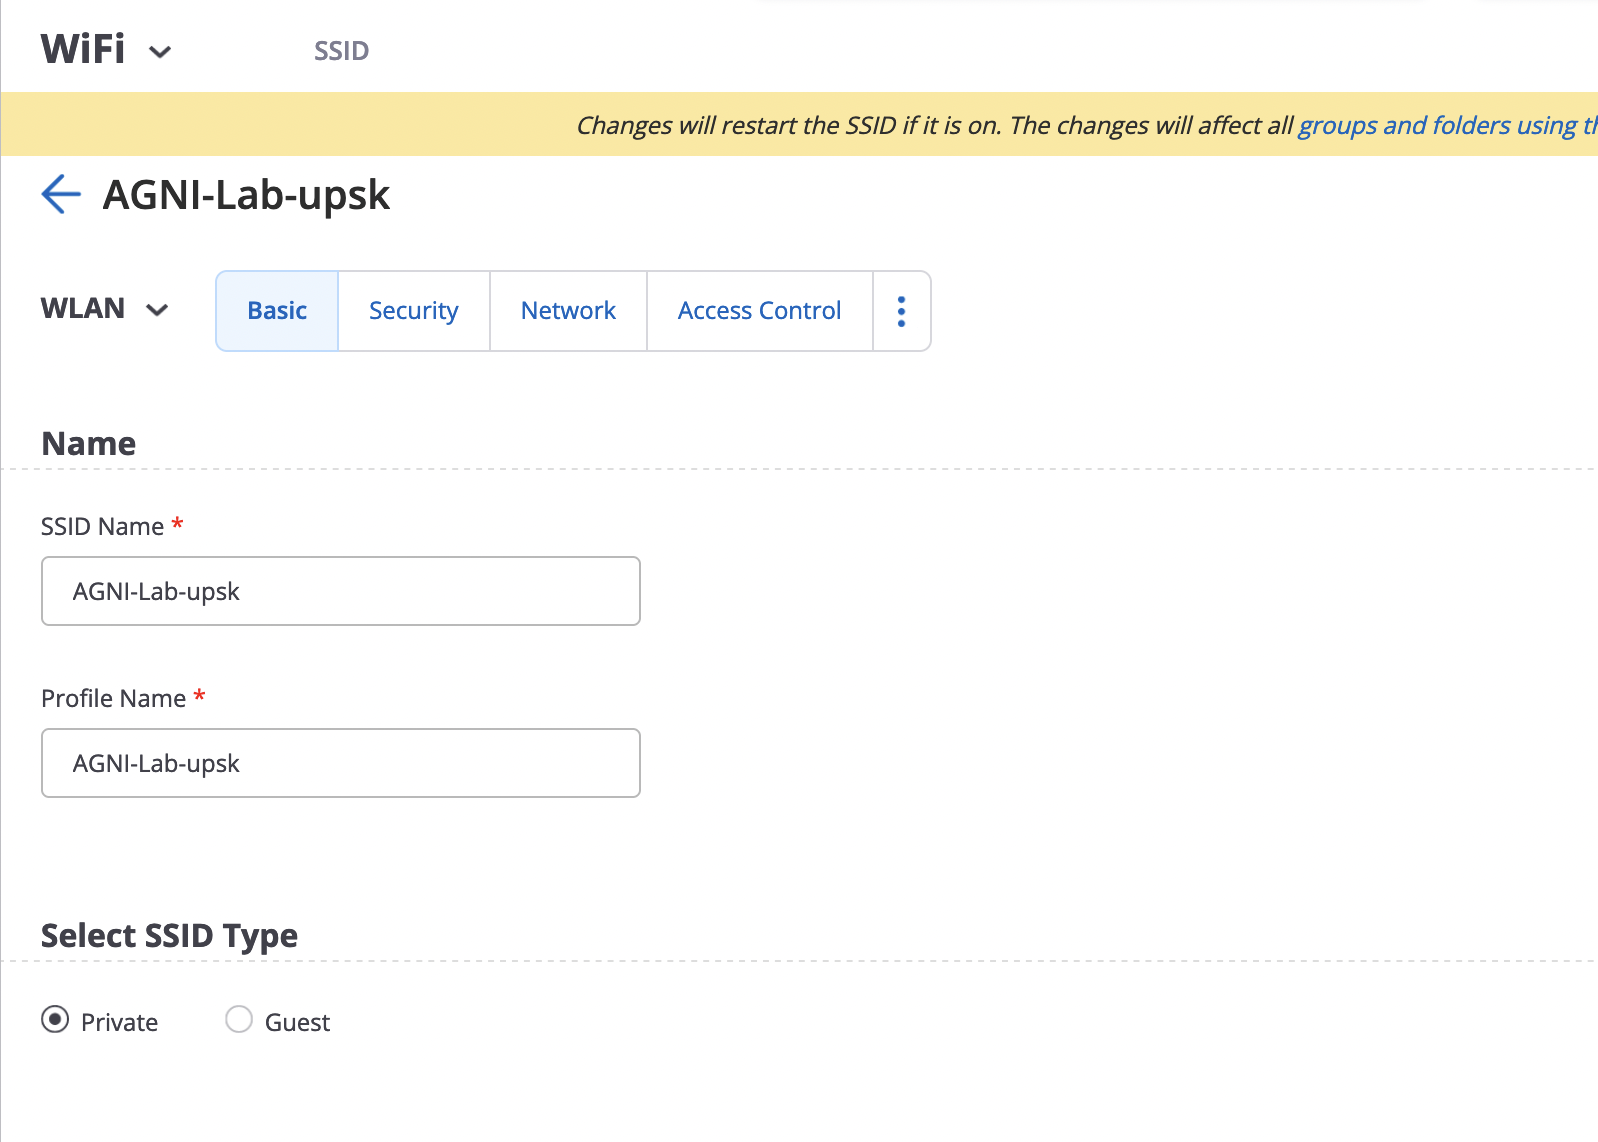
- Provide SSID and profile name:
- Under Security select WPA2 and UPSK:
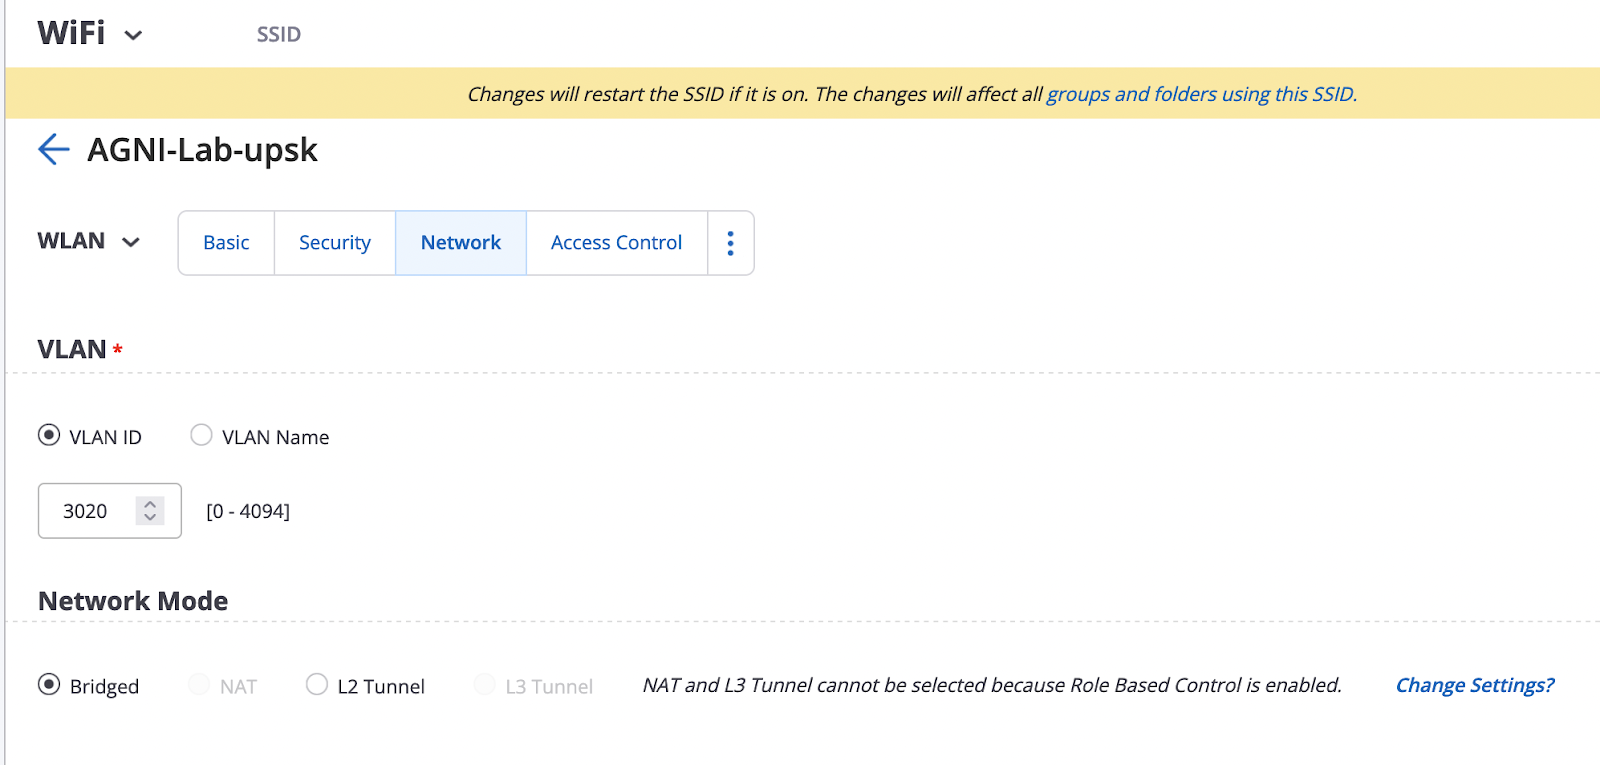
- Under Network Add the relevant VLAN. The VLAN should be unique and cannot be the same as other SSIDs in a specific location. The Arista AP cannot do UPSK Cracking features if it is in the same VLAN as other SSIDs. This SSID needs to be in a separate VLAN
- Navigate to Access Control select RadSec and add/edit under Radius Servers relevant Primary and secondary Radsec and Accounting Servers as configured in Step 1.
- Scroll down and make sure “Change of Authorization” is checked.
- You can define any other Parameters for the SSID like RF OR Analytics as required. After doing the same, Click on Save and Turn ON the SSID.


Configure AGNI Server to do UPSK
Access Device Configuration
APs that are setup with Certificates need to be configured on the AGNI as Access Devices. For the same, we will need the MAC address of the AP. If using AGNI PKI, then when generating the certificates for APs, the AP MACs would have been already added. However, if using the default TPM Module in APs, then we will have to add the AP MAC addresses in AGNI. We can do so individually by navigating to Configuration > Access Devices > Devices > Add Access Device:

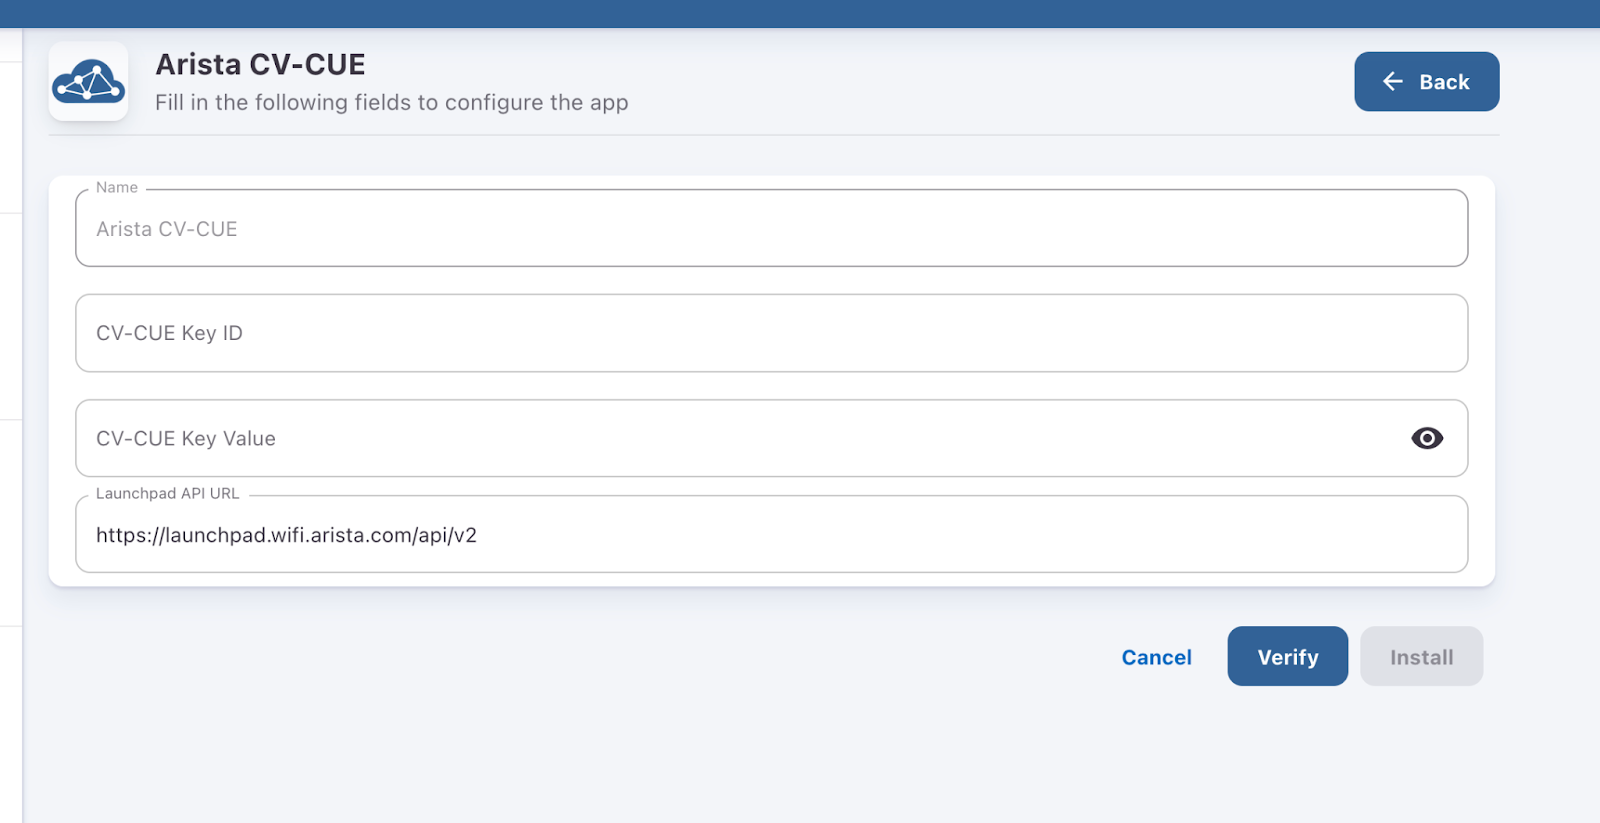
If there are many APs, we can use API Keys to pull the AP information. A viewer access API key can be generated on Wireless Manager Launchpad. The KVP can be then used by AGNI to pull the AP information. For the same, you can navigate in AGNI to Concourse > Explore > Arista CV-CUE > Click on Install

Provide this information and click Verify. Once Verified; click Install
After installing, the same will be available in Concourse > Installed Apps:

The Connection Logs can be viewed under Application Logs > Show Logs. You can do a manual sync OR it can happen automatically whenever relevant permissions for the KVP are changed/updated.
After doing the above, you should be able to see all the APs (as per KVP permissions) on AGNI in Access Devices > Devices Location.
Network Configuration
The Network Configuration is very straightforward. We simply provide the SSID name, type of Network; UPSK in this case and the initial role for Onboarding. This initial role will be used for user Registration. The same registration process can be avoided using UPSK Cracking with WPA2 which we will discuss later. Navigate to Access Control > Networks > Add Network


Once the network is created with the above information, a URL link is generated and show domains will pop up. The URL generated here will be used to add in the Onboarding role used in CV-CUE as defined CV-CUE Role Configuration > Redirection link. The Domains will be entered in Authorized allowed list for users to communicate with the same before being authenticated via Captive Portal:

Add Segments
Once you have the devices added, IDP configured and network ready in AGNI; we are good to test the UPSK solution. However, there is an optional component to add Segment. Here we can define various conditions on when a UPSK policy should hit and what should be the aftermath based on the type of user, group, etc. By default this is set to allow all communication. To give a basic example, only users with certain type of attributes can be allowed access. Example only if the Employee_Type is Employee, we allow access for UPSK which can be defined as shown below:
This can be set in AGNI > Access Control > Segmants > Add Segment:

Here Network Name is the name of the network defined in Network Configuration along with the condition of the user being an Employee and the Action set to Allow Access only if the above is true. We can change the default setting to deny all and control the level of access for different users accordingly.
Testing
Verify RadSec is up
Navigate to Access Devices > Devices > Filter the specific AP name or MAC and verify a Green LED besides the same showing that the radsec is up and running.

The same can be done from AP Config CLI using the command “show log radsecproxy” and verify the status says up.
Connect a client using registration process
- Scan for the configured WiFi SSID
- Enter the onboarding Passphrase as defined in Network Configuration of AGNI
- The client shows up the registration page OR self registration portal which will look like
- In this case, we use OneLogin as IDP, so I use OneLogin user email and click proceed. The page gets redirected to OneLogin for further authentication
- After successful authentication with OneLogin, we will be presented with Client Registration page
- Here the MAC address will be self populated along with the description with the name of the phone. The MAC address is not editable, but you can update the description of the device. Click Register after doing the same.
- On successful registration, you will be represented with the Passphrase screen. This passphrase will be your PSK which will be linked to the username that was entered during the start of the registration process.
- An email with the same passphrase will be sent to the email address entered during the time of registration.
- The device will be disconnected after the above process as a part of CoA. However, since the password now changes to login to the same SSID, we need to forget the SSID network and use the new PSK which was copied earlier to login to the SSID.
- The Client is now connected and ready to access the network.


Connect Client without registration
This is a short cut way of connecting the client to the network without actually following the above registration process. The same can be done when UPSK Cracking is enabled on the AP provided the Security used is WPA2. This will not work with WPA3. Make sure on the SSID profile configuration in CV-CUE has the following enabled:
UPSK User Private Network and UPSK Identity Lookup.

The new client will follow the UPSK Cracking Workflow as defined above.
This can be done by accessing the Client Management Portal Page of AGNI which can be accessed from Client > Clients > Client Management Portal

This link can also be accessible from the email received at the time of registration. Open that link from any device and you need to login using the relevant IDP (OneLogin in this case). After logging in, you can simply go to WiFi Passphrase and see your PSK and use the same to connect any device using WPA2. You can even scan the QR code in which case, the device directly connects to the SSID using the passphrase shown without any intervention.

Finally, the passphrase can be changed as well. However, it will still be system generated.
Note: The comments are my personal and information above regarding the workflow or testing are my personal understanding and to the best of my knowledge. Feel free to leave a comment for corrections if any.

One thought on “Arista WiFi WPA2-UPSK with AGNI using RadSec and OneLogin as Identity Provider”