Problem Statement/Use Case:
Guest access in an Enterprise network has become a necessity. As mobile devices are getting widely accepted the data demands are as well increasing every day. In an Enterprise Network a Guest network is isolated and when considering the fact that all devices should have access to internet; care should be taken such that these devices are accounted, authenticated and authorized. There are various methods to achieve this. One of these implementations is using CoA i.e. Change of Authorization. This uses the Server-initiated login mechanism of ClearPass.
Requirements for using Guest SSID:
- WLAN SSID should be open authentication i.e. no PSK or WPA/WPA2.
- Guest user should receive a Captive Portal page to enter user credentials.
- Guest user will receive the user-credentials to perform Captive Portal Authentication from Reception/Helpdesk.
- A Guest user should be allowed access only till 8 hours. Then the Captive Portal Authentication should happen again with new credentials.
Workflow Diagram:
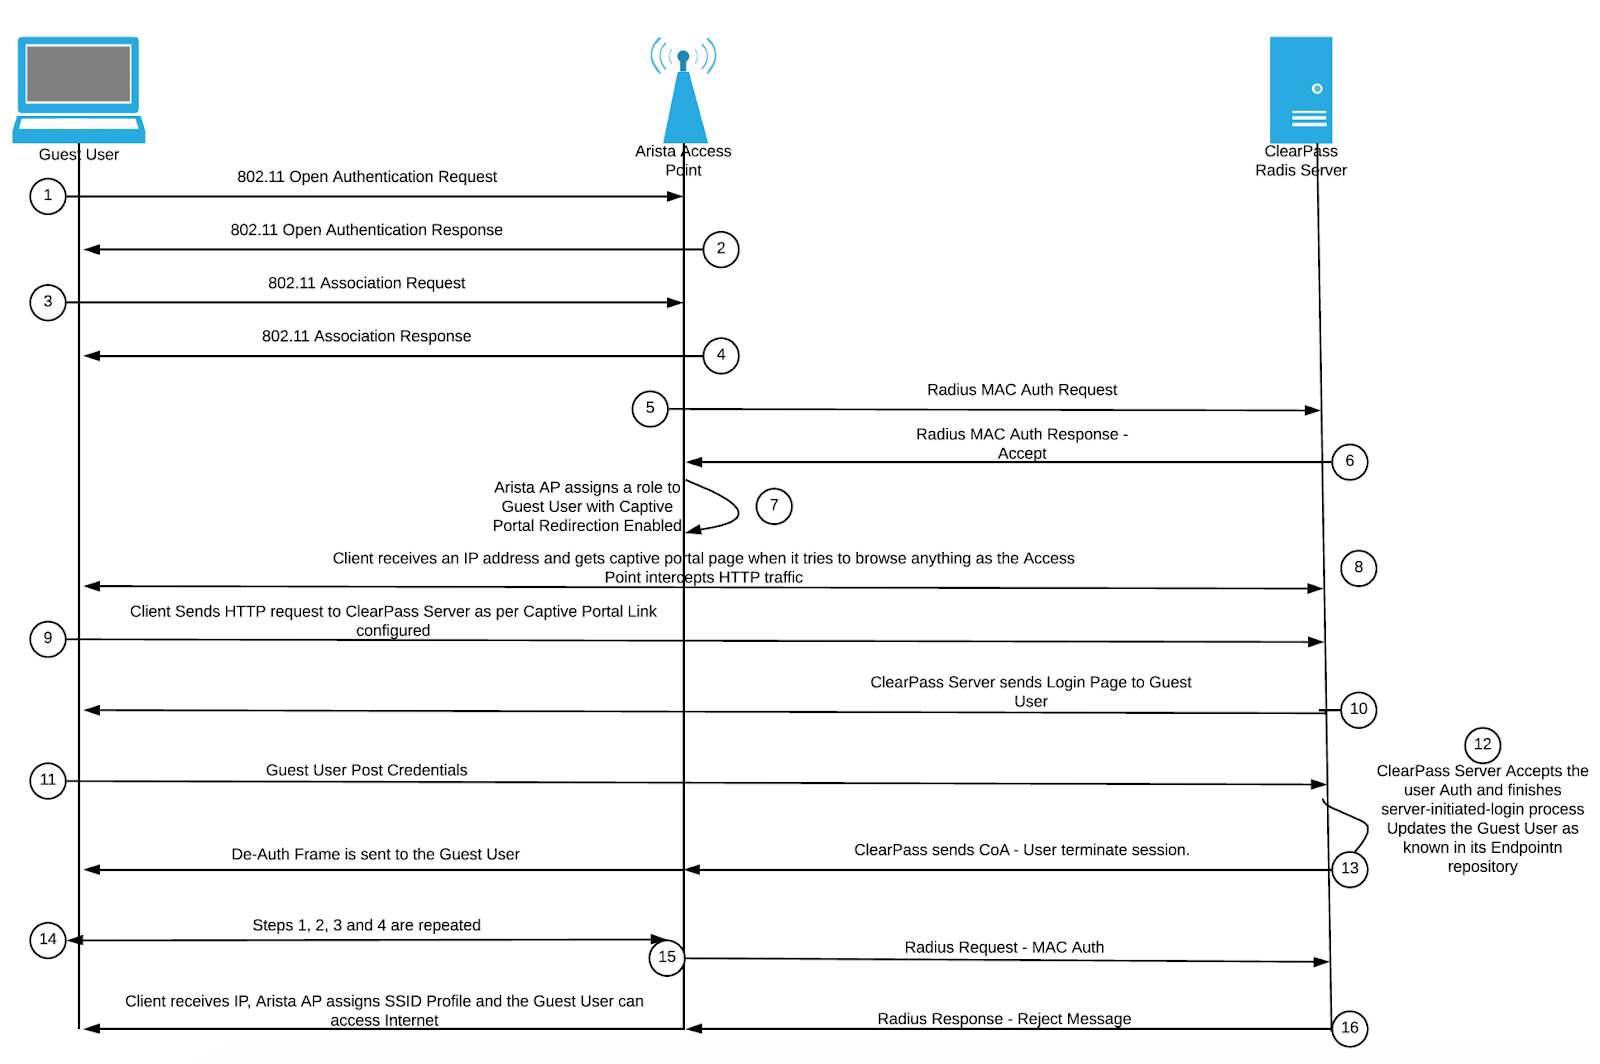
Workflow Framework:
There are 3 different components in the above workflow. Guest User, Arista Access Points and ClearPass Server. All these components communicate with each other using predefined framework like HTTP/HTTPS communication, MAC Authentication and CoA.
Components of this Workflow:
As defined before, there are 3 different components for this Guest Workflow. Responsibilities of each of these devices is as per below:
- Guest User: This is the device trying to request access as a Guest user in an Enterprise Network. The WLAN of this device should connect to the open Guest SSID and should have a web-browser to authenticate itself to captive portal.
- Arista Access Points (Arista AP): Guest User will communicate to Arista AP via Guest SSID to access the network. While the Guest User will not be given any access until it completes Authentication with the Server; the Arista AP will proxy the requests for this user to ClearPass server. APs should broadcast Guest SSID with open Authentication. The AP should support secondary authentication as MAC Auth and send the Access-Request with MAC address as username and password. APs should be able to each ClearPass server from its wired network. Arista AP and ClearPass server should be in sync by using the correct Radius Key.
- ClearPass Server (CPPM): This will act as a Web Server for Web authentication. The captive portal page will be hosted by CPPM server. The same server will act as a Radius server for MAC Authentication. This server should adhere to all the requests coming in from all the Arista APs and provide appropriate response upon checking its own Endpoint and Guest user repositories. This device should also manage the timers for MAC auth and Guest User. This device will be responsible for sending Disconnect CoA to the Access Point.
Workflow Steps Explained (Refer to the above Work Flow Diagram):
- 802.11 Authentication Request is sent by the Guest User which is trying to request Guest Access. This is a 802.11 Auth frame which specifies the Arista AP the medium of communication is RF or WiFi.
- 802.11 Authentication Response to the Request is sent by the Arista AP.
- Then an Association request is sent to get Associated to the Access Point for further communication.
- An Association response to this Request is sent by the Arista AP to the Guest User. This message completes basic WLAN communication between the Guest User and Arista AP.
- Arista AP then sends a MAC Authentication Request to the ClearPass server as per configuration. The Authentication request will have username and password both as MAC address.
- The CPPM server is configured to allow MAC Authentication for all the Clients and hence a Radius Accept to the MAC Auth request is sent back to the Access Point. The MAC address will be marked known in the Endpoint repository in CPPM.
- The Arista AP is setup to apply a role with Captive Portal redirection enabled in case it receives MAC Auth Success from CPPM Server. After applying the role, the Guest User communicates to ClearPass Server directly through the Captive Portal redirect Link.
- Guest User now receives the IP address. Since this particular user has a Captive Portal Role applied, when the user tries to access anything it will get a Captive Portal Redirect page. Many smart devices now can throw a pop-up window with the Captive Portal Login page which doesn’t need manual browsing in the web browser. Whenver the user tries to access a web browser, it will get redirected to the Captive Portal Link.
- Guest User Sends HTTP/HTTPS request to captive portal redirect link. This Captive Portal page is hosted on CPPM Server. Hence, the request reaches the CPPM Server.
- CPPM Server then Presents the user with a Captive Portal Page in response to the HTTP/HTTPS request of the Guest User.
- Guest User POST’s credentials to the CPPM server.
- CPPM server checks for the credentials and if the same are found in Guest User Repository, it will authenticate the user. An Accept message will be triggered to itself. A MAC Auth-Expiry attribute is attached with this response for the Guest MAC address with an Expiry time after which the client needs to login again using Captive Portal Link.
- ClearPass Server sends a Terminate Session Request for this AP. This is done through Change of Authorization (CoA). The AP adheres to this request and sends a de-auth frame to the Guest User.
- The Client now is completely removed from the WiFi network. As per normal client behavior, the Guest User tries to authenticate again to the WiFi network and repeat steps 1, 2, 3 and 4.
- Radius MAC Auth request is sent again as per config by Arista AP to CPPM server.
- This time, since the MAC address is known and if the MAC Auth Expiry time is greater than the Current time on ClearPass; the server will now Send a Reject message to the Arista AP. On receiving the reject message, the Arista AP will put the Client in a default SSID profile which doesn’t have any Captive Portal redirect. The user browses the internet as per policy on its VLAN.
Guest User/WLAN Station Settings
Nothing specific is required on the Guest User as such with respect to the URL. However, the client should have a working WLAN driver which can connect to an Open SSID in 802.11a/b/g/n/ac (any). The client should have a Web Browser and optionally Guest User Credentials to login. If the Captive Portal page is sign through i.e. accept “Terms and Conditions” and Submit, then no need for Guest User Credentials.
Arista AP Config
The Arista AP should be configured to broadcast the SSID with proper VLAN mapped so that the client can reach the ClearPass Portal page for performing Web Authentication. Arista AP should also do a Secondary Authentication as MAC authentication and apply a role on a successful MAC auth. Below are the steps to configure SSID with MAC Auth in Arista AP*:
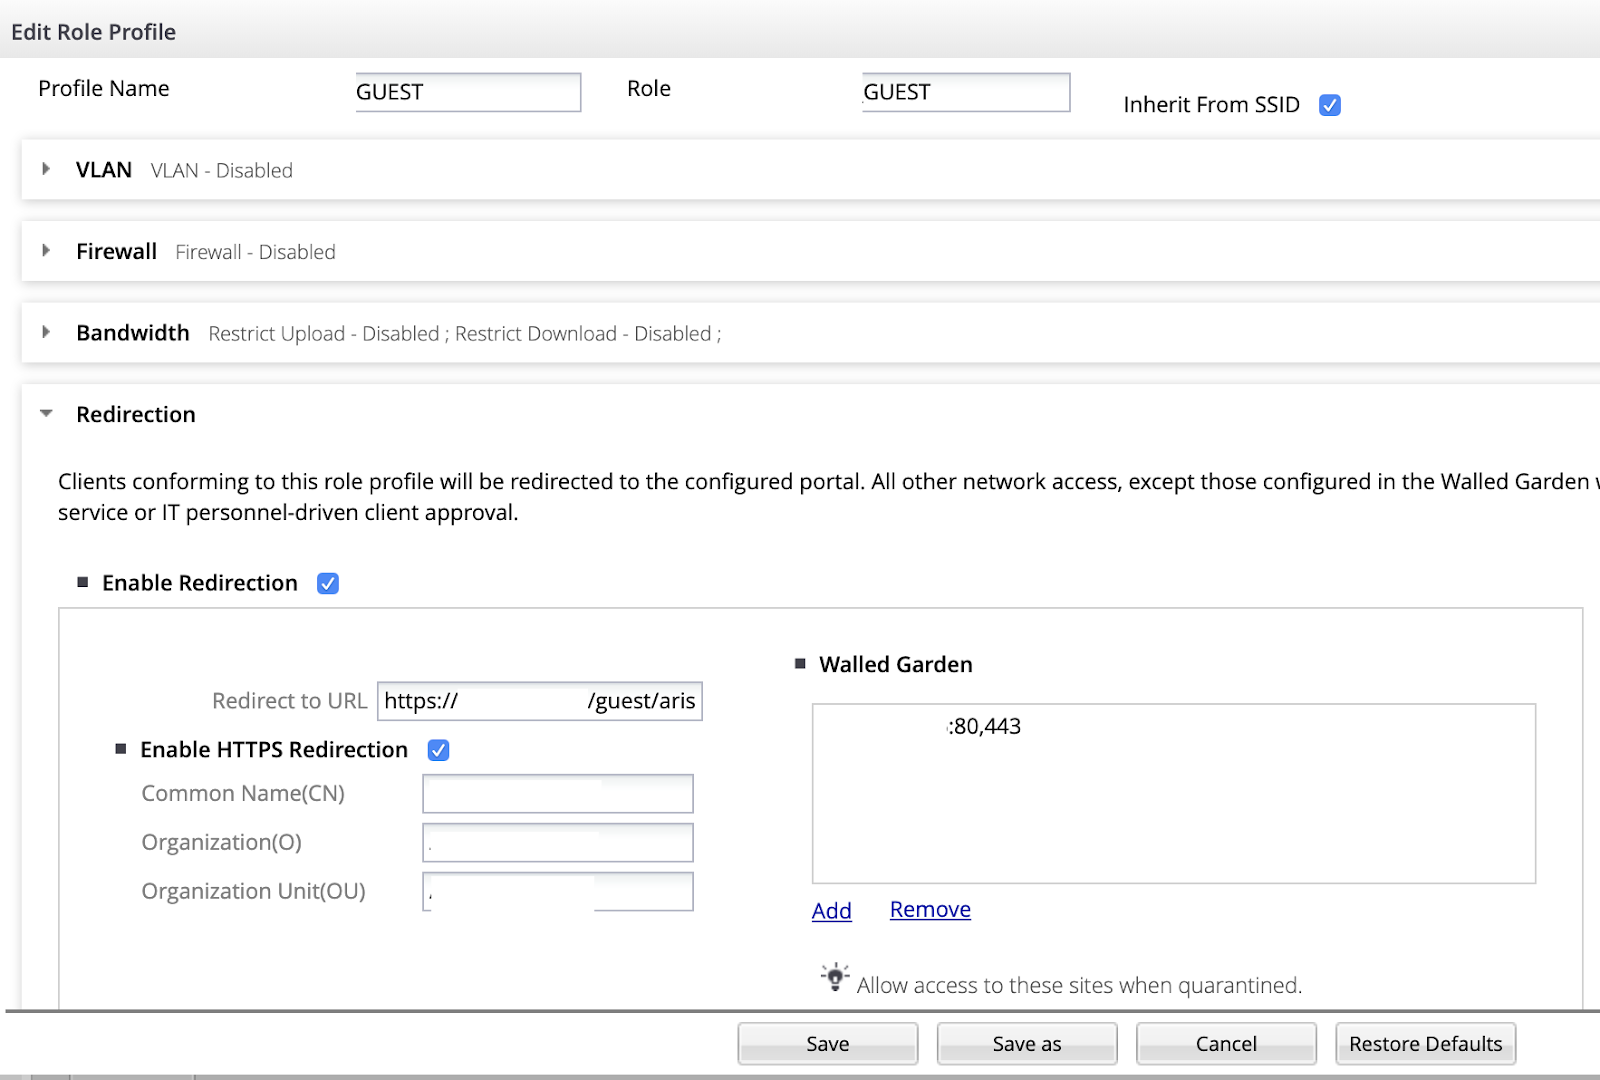
- Role Config: Access the Specific Location Folder where this SSID needs to be broadcasted. Configure a Guest Role which will have the Captive Portal URL. Navigate to Configuration > Device Configuration > Role Profiles > “Add Role Profile”
- In the role Configuration provide the Profile and the Name of the Role. Expand Redirection and check the box to enable the same. Copy/Paste the Redirect URL which is generated by ClearPass (shown later below). Enable HTTPS redirection and specify appropriate Common Name (CN), Organization (O) and Organizational Unit (OU). Add ClearPass FQDN or IP address in Walled Garden so that AP doesn’t block communication to ClearPass. Optionally you can add apple.com for CNA (Captive Portal Network Assistant) feature which is used for Apple devices. Click Save.
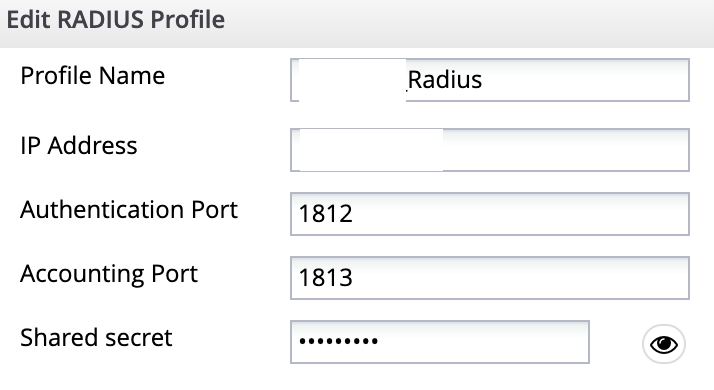
- Radius Profile Config: Configure Radius Profile for Secondary Authentication OR MAC Authentication. Navigate to Configuration > Device Configuration > RADIUS Profiles > Add Radius Profile.
- Give a radius Profile Name, IP address, Authentication and Accounting Port and a Radius Shared secret which should be same in ClearPass:
- SSID Config: Navigate to Configuration > Device Configuration > SSID Profiles > “Add New Wi-Fi Profile”.
- Give a Profile and SSID Name for this SSID:

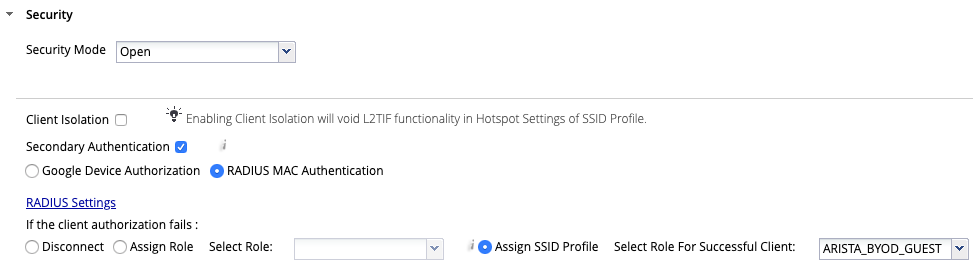
- Expand Security tab. Select the mode as open and “Select Role for Successful Client” as the one configured in Step 1. Make sure “Assign SSID Profile” radio button is selected. See below:
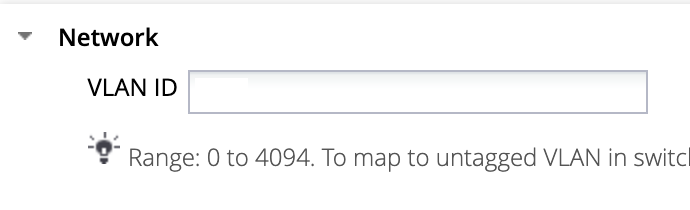
- Assign a VLAN ID under Network tab from where the Guest users will receive the IP address:
- All other settings are default. There can be various other settings that needs may need to be configured as per requirement. However, for this illustration we are considering everything to be default.
- Radius Settings under SSID Profile: There are certain Radius settings that needs to be edited for the CoA to work. Below are the settings used and are working fine:

As seen above we use NAS ID as %s which in this case is the name of the SSID. Please note that the default value for this %m and %s. This would make the Access Point to send NAS ID as Wired MAC of AP and name of the SSID. For ClearPass CoA to work, ClearPass needs to send NAS ID or the CoA request will not be adhered by Arista AP. For synchronization we will use only the name of the SSID as NAS ID in both ClearPass as well as Arista AP.
4. After all these settings are configured and verified, this SSID needs to be pushed to Device Template used by the Arista AP so that it starts broadcasting this SSID.
ClearPass Config
As this process is called Server-initiated login, most of the process in the above workflow is been handled at ClearPass. To achieve this workflow, this server needs to be configured with MAC Authentication policy that allows MAC Auth for all Guest Users (without adding their MAC address in ClearPass database) and Web Authentication policy to perform Captive Portal Authentication.
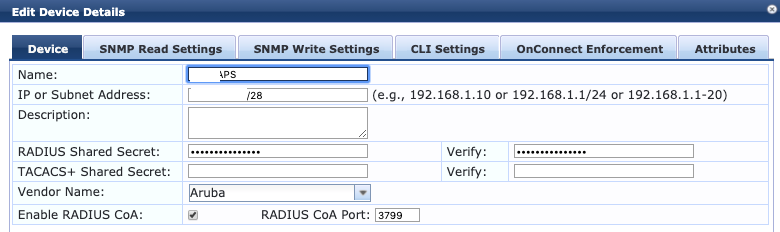
Devices and Device Group Configuration: We need to configure the Arista AP IP/Subnets as devices OR Device Groups. It’s like adding a Radius Client in a Radius Server so that Radius is aware of from which device it may receive Radius Requests. This can be done in Configuration > Network > Devices and Device Groups. If at all there are multiple Policies for different devices then to do a proper policy categorization we can add the Device Group as one of the conditions as service rule in a Service as per example requirement “e” in the below MAC Authentication Policy. Radius Shared secret should be configured as configured in Arista AP Radius profile Configuration. They both should be same. Make sure CoA is enabled in the Devices Configuration:
Role Configuration: We would need one Role as a default Role for Role Policy which will in turn be used in MAC Auth policy. This can be anything. This can be configured in Configuration > Identity > Roles. For this example we have configured as per below which will be referenced as Default Role in Role Mapping of MAC Auth Policy:
MAC Authentication Policy: This policy will allow MAC authentication for all the Guest users that are trying to login to Guest SSID. Below are the requirements for MAC auth for this workflow:
- MAC Auth Accept should be sent for all the Guest Users that are trying to login before CoA.
- Once Accept is sent, this Guest User MAC which in ClearPass will be an Endpoint should be marked as “known” client.
- If already a MAC auth Accept is sent before i.e. if the Guest user is “known” and the Guest User request is coming in before the MAC Auth Expiry timer for that user; ClearPass should assign a “Guest” role to this user and a MAC Auth Reject message should be sent to the Arista AP.
- A MAC Auth Accept message should intimate Arista AP that the client needs to do Captive Portal Authentication and a MAC Auth Reject should allow access to internet (This is weird, but it is explained later).
- This policy should only be applied if the requests are coming in for Guest SSID.
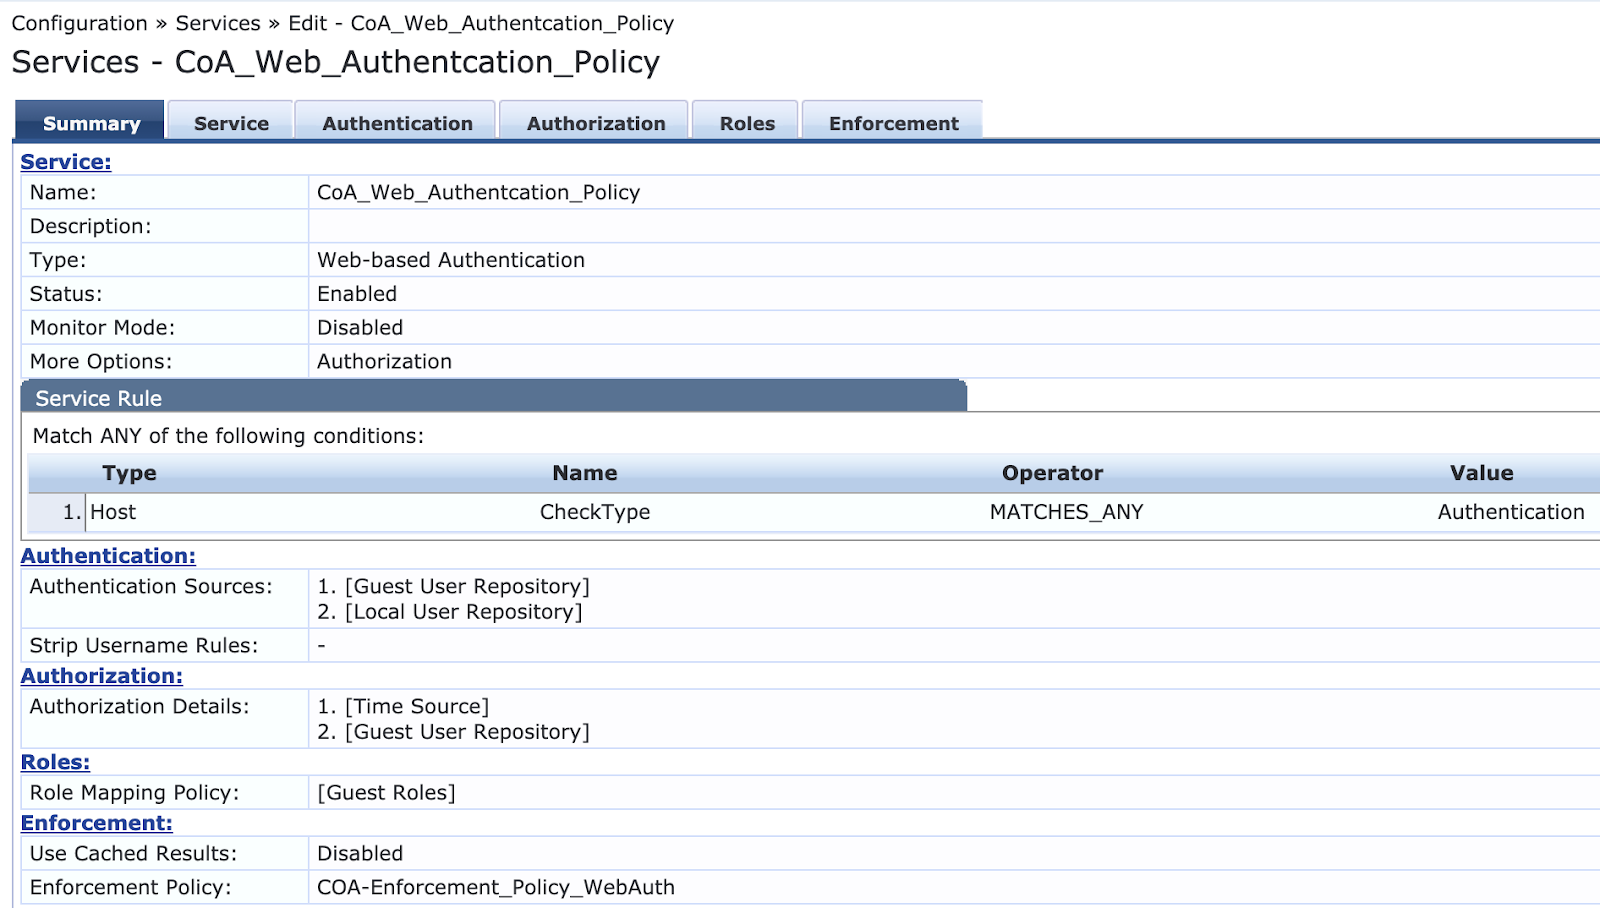
Below is the summary snippet of MAC Authentication policy config:
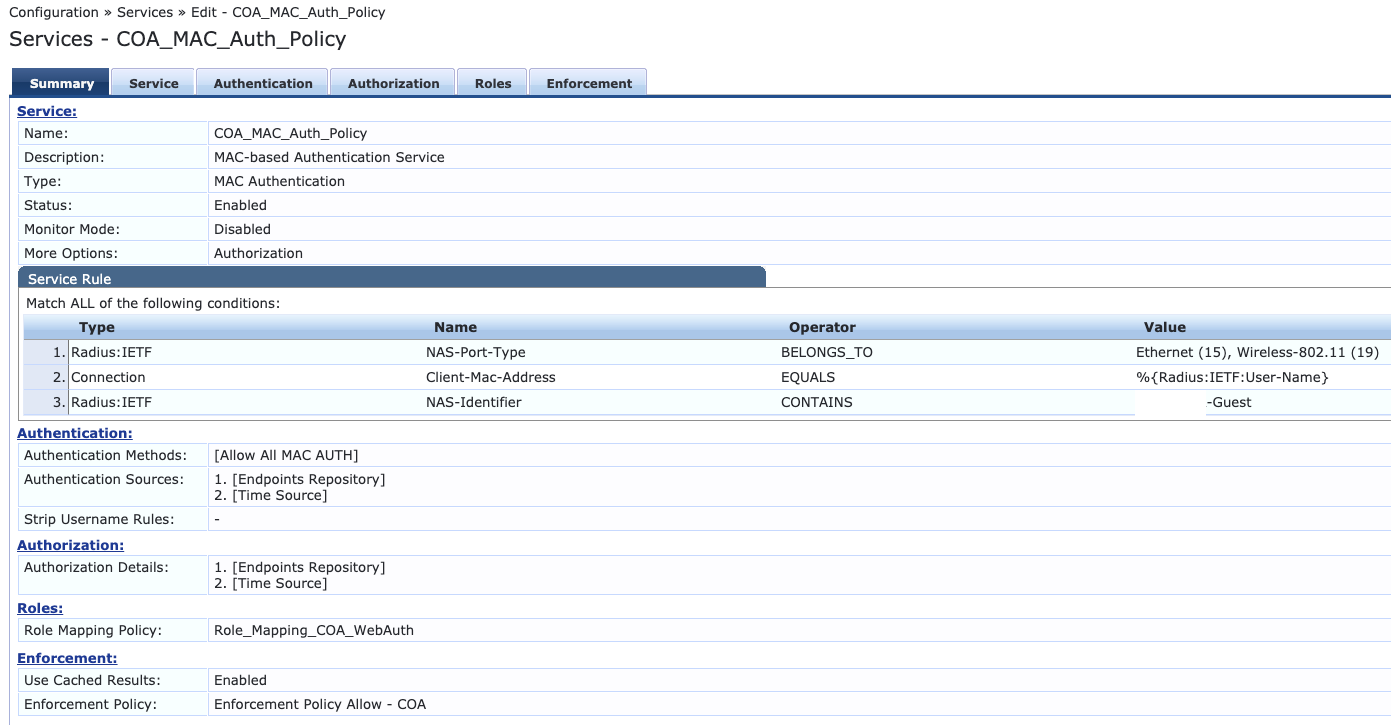
As seen in the above summary page, there are few config parameters within the MAC auth policy. Below are the settings of each of these:
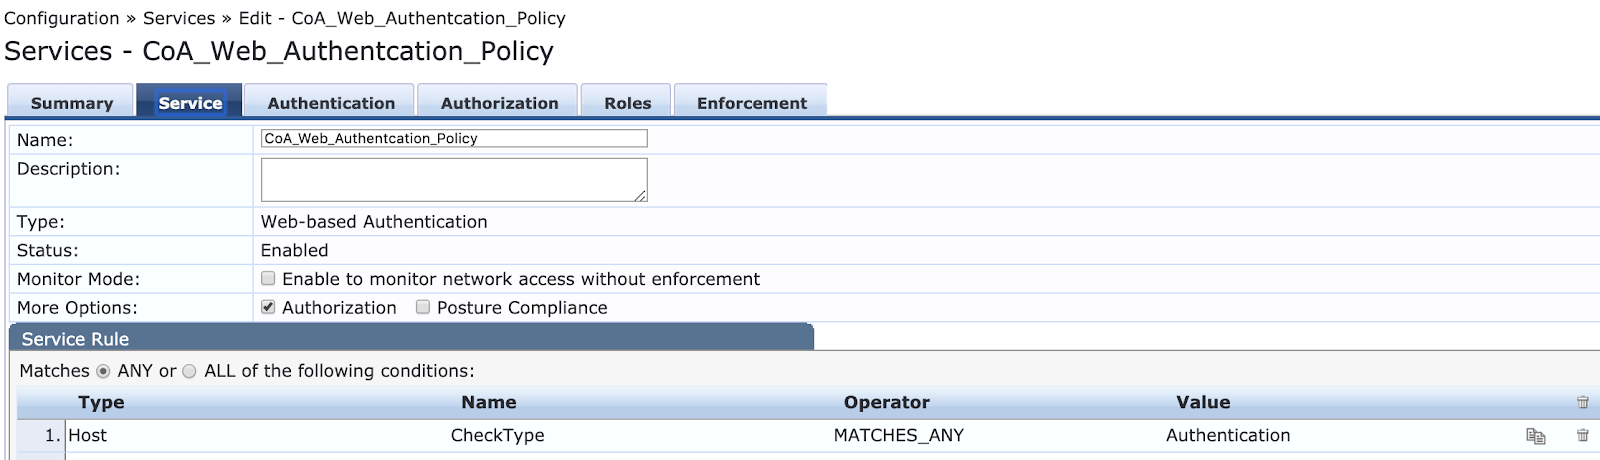
- Service Tab: In this tab we define the type of Policy. For our case, it is “MAC Authentication”. We need to enable Authorization as ClearPass takes care of Authorization part as well. Then we define the service rules which are used by ClearPass to act on any Guest User request. These rules should be defined in a way that only Guest User requests are hit. Make sure the NAS Identifier is the SSID name. Rules are self-explanatory for an individual with WLAN Authentication experience. Below is the snippet of Service Tab page:
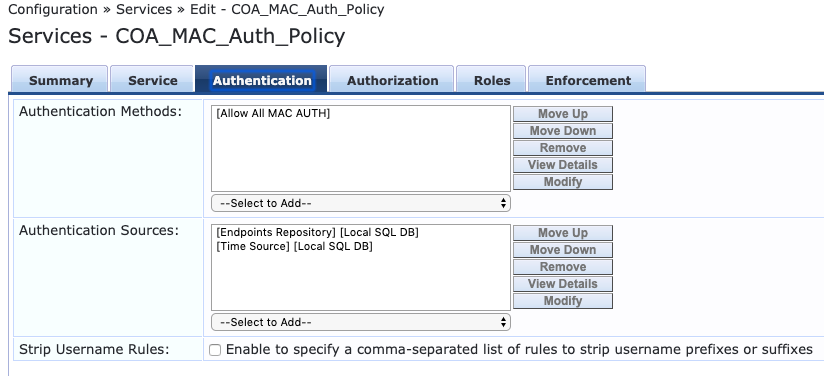
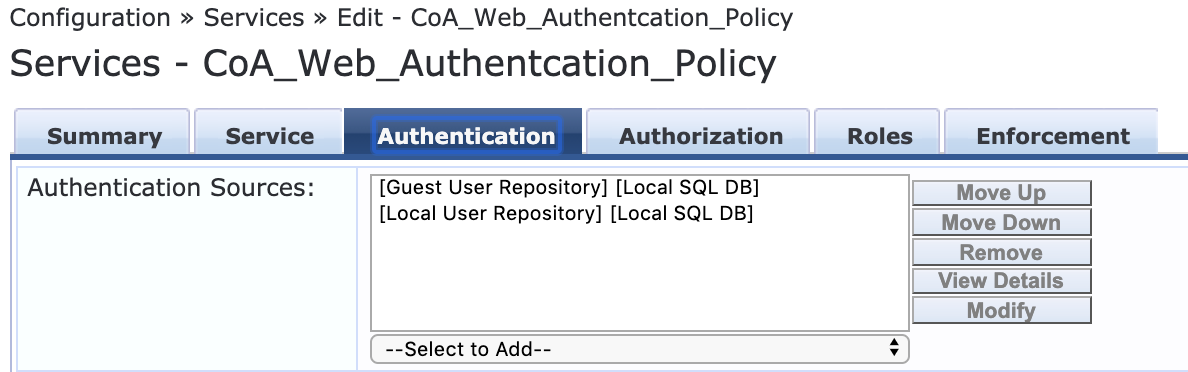
- Authentication Tab: In this tab we define that all users will be allowed to do MAC Authentication successfully as this is a Guest SSID and adding MAC address of each of the Guest user can become a tedious process. Authentication source will be Endpoint repository and Time Source as the Users “known” state will be saved in Endpoint repository in ClearPass and Time Source will attach an Expiry time for each of these Guest Users. Below is the snippet on the same:
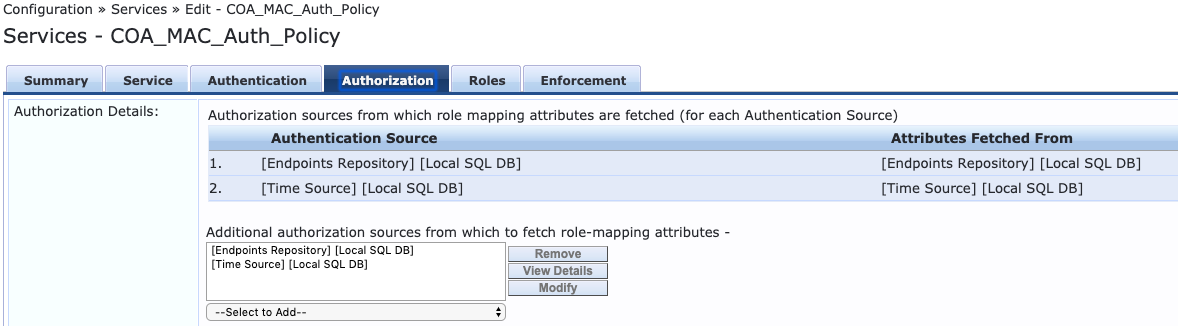
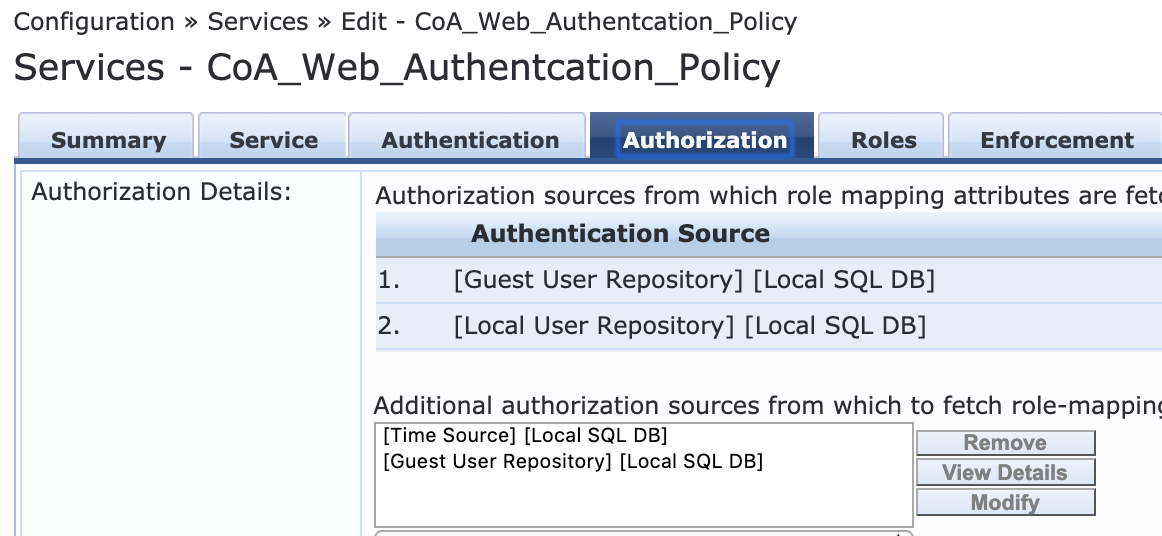
- Authorization Tab: ClearPass is the Authorization source for this workflow and hence the Authentication sources will also be the Authorization source. Below is the snippet from Authorization tab:
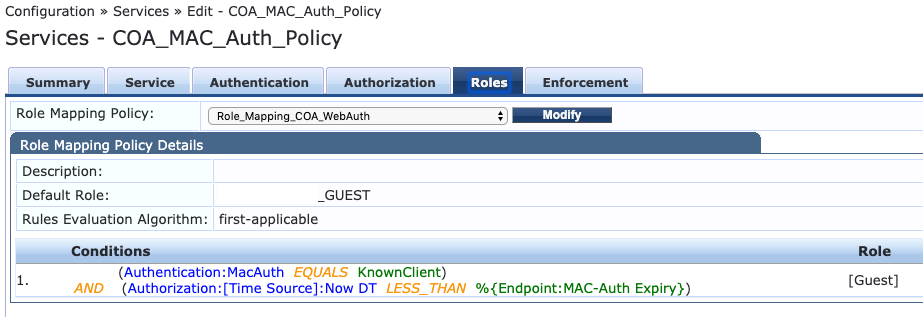
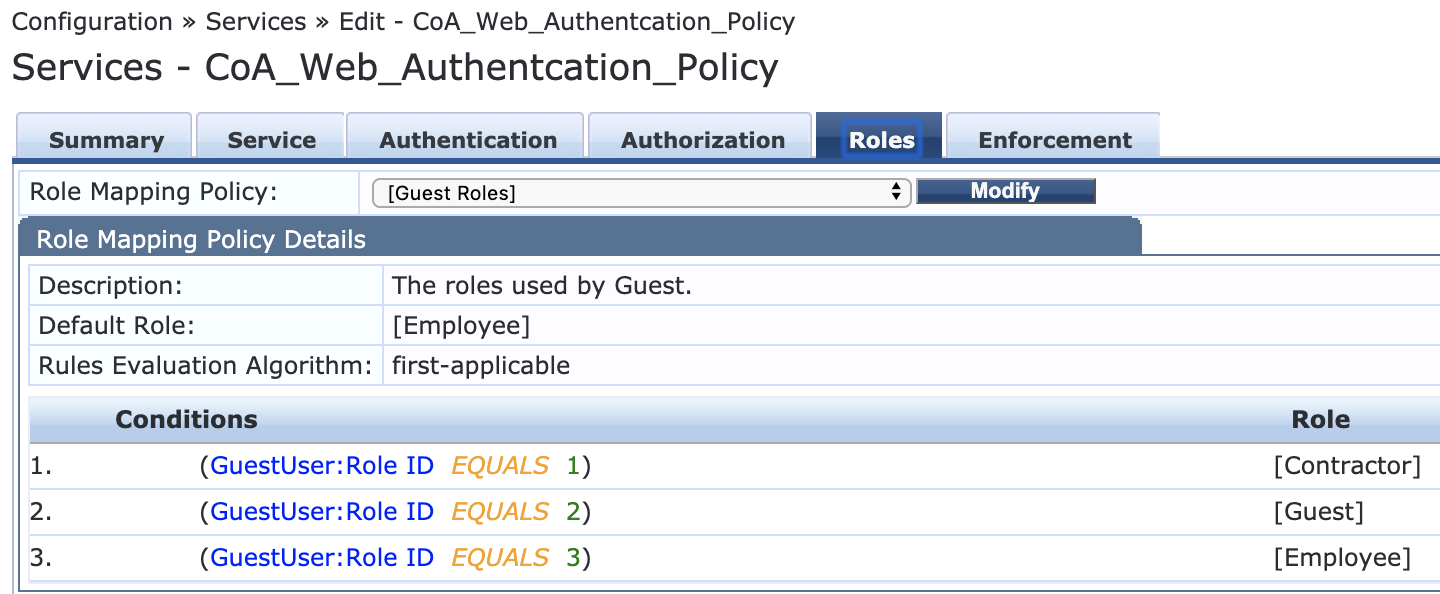
- Roles Tab: In this config part, “Role Mapping Policy” is mapped. For our workflow we need to define two different Roles. One role should be Default Role for which Captive Portal page should be set. This default role is assigned by ClearPass internally and if a Guest User falls into this role, ClearPass sends a MAC Auth Accept to the Arista AP which has Captive Portal redirect defined. The second role is “[Guest]” role which is one of the default roles in ClearPass. A Guest User is assigned this role only when the User’s MAC is “known” and if the “MAC Auth Expiry” timer is less than Current Time in ClearPass. The default role can also be anything else, however if not using default, make sure the same is created in Identity > Roles. The role mapping policy can be configured in this Tab or it can also be configured in Identity > Role Mappings and then can be called in this part of config. Below is the snippet:
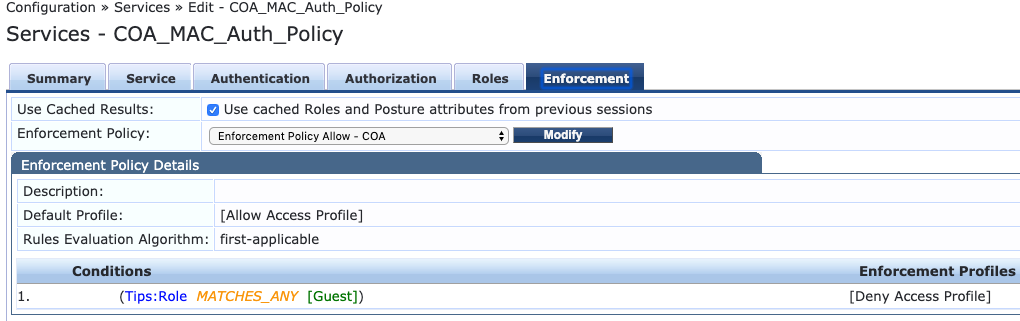
- Enforcement Tab: In this tab we define what actions or enforcements ClearPass takes in the event of the service being hit with respect to the roles defined in the Roles tab. In this tab as well we need to map the Enforcement Policy; which can be configured in this tab OR it can be beforehand configured in Enforcement > Policies. For this workflow we can use default Enforcement profiles like “[Allow Access Profile]” and “[Deny Access profile]”. As the name suggests, Allow Access will send Radius MAC Auth Accept and Deny Access will send Radius MAC Auth Deny to Arista APs. Make sure “Use cached Roles and Posture attributes from Previous sessions”. Here we define a condition that only when the Guest User has “[Guest]” role in ClearPass, it enforces [Deny Access Profile] and sends a Radius MAC Auth Reject to Arista AP. Else all other times ClearPass will enforce [Allow Access Profile] which will send Radius MAC Auth Accept to Arista AP (which has Captive Portal redirect configured). Below is the snippet:
Web Authentication Policy: This policy is used by the ClearPass to authenticate Guest User’s Web Authentication Requests. Below are the requirements for Web Authentication Policy Usage:
- The ClearPass should check the Guest User credentials used against its own Guest User Repository and verify if they are correct. ClearPass should then send Auth Accept or Reject to the Guest User.
- The ClearPass should send a Terminate Session request to AP on successful Authentication of the Guest User. This request will be sent as CoA request.
- The ClearPass should attach a MAC auth Expiry timer for this Guest User.
Similar to MAC Auth Policy, this policy as well has similar parameters. Below are the settings for each of these:
- Service Tab: In this tab we will select the service type as “Web-based Authentication”. Make sure Authorization is enabled as the Guest Users clearing Authentication will be authorized as per configuration in ClearPass. A default service rule as shown below will be configured automatically:
- Authentication Tab: In this tab, we define the Authentication Sources. In this case, it will be “Guest User Repository”. Below is the snippet:
- Authorization Tab: As mentioned earlier, we need to add Authorization sources as well because ClearPass will be the Authorizing devices. Also, MAC Auth Expiry Timers will be assigned to MAC address by adding Time Source as Authorization source in ClearPass. Below is the snippet:
- Roles Tab: In this policy Roles application really doesn’t matter. However, for the sake of consistency, we chose “[Guest Roles]” default Role Mapping Policy. Below is how it should be:
- Enforcement Tab: Here we define what enforcement this policy applies to a Guest User if it adheres to the condition defined. Before going through the Enforcement Policy, we need to first define Enforcement Profiles. These can be configured in Configuration > Enforcement > Profiles:
CoA-Terminate-Session Profile: This profile sends a Terminate Session request to the Arista AP. Here we define the NAS Identifier for Arista AP as the name of the SSID. Without this attribute, Arista AP will not adhere the CoA request. Below are the settings:
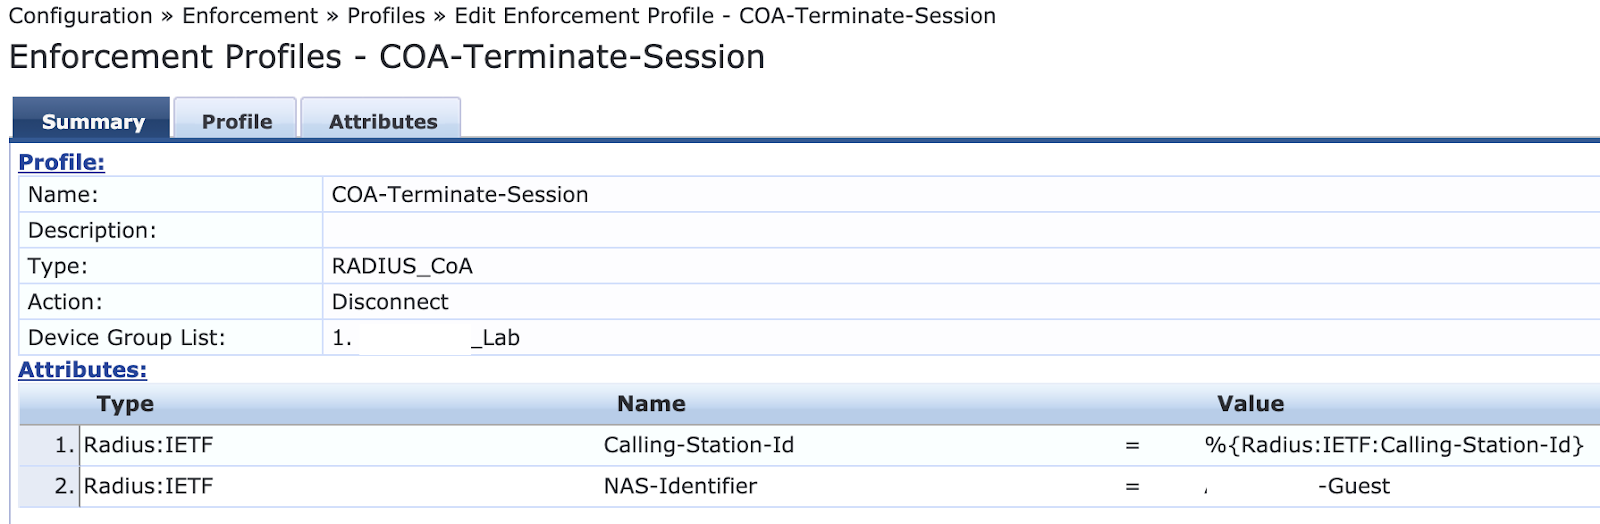
Make note that we are not including
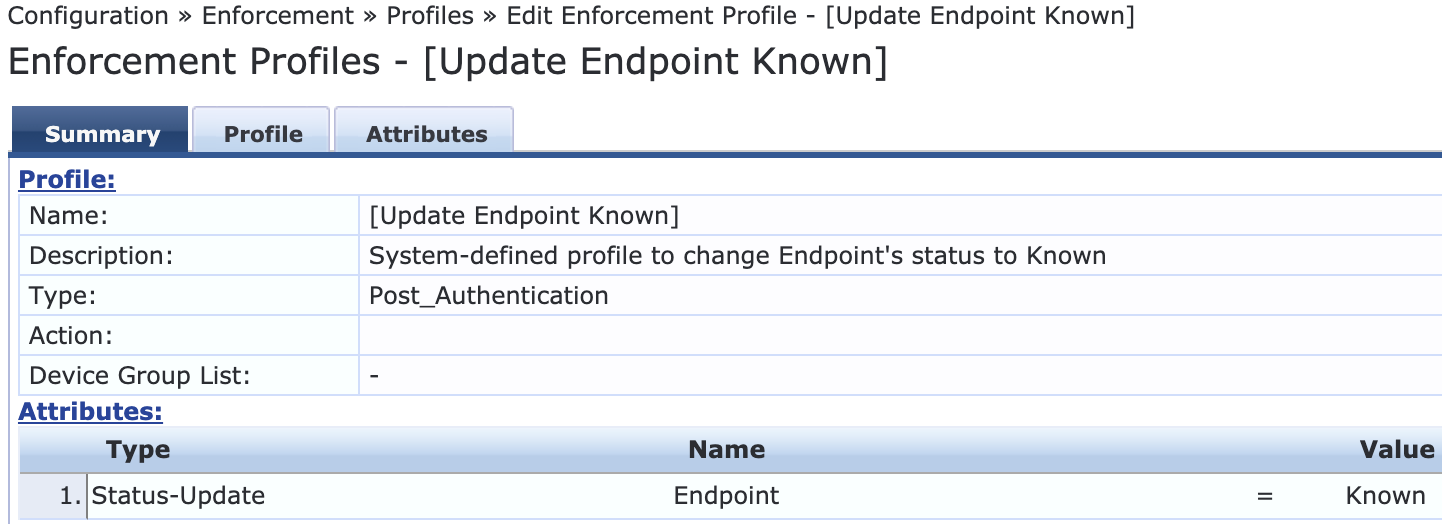
[Update Endpoint Known]: This is a default Enforcement Profile that marks the Endpoint known for ClearPass. As explained earlier this will be used later in MAC auth to verify if the Guest User is known or new login:
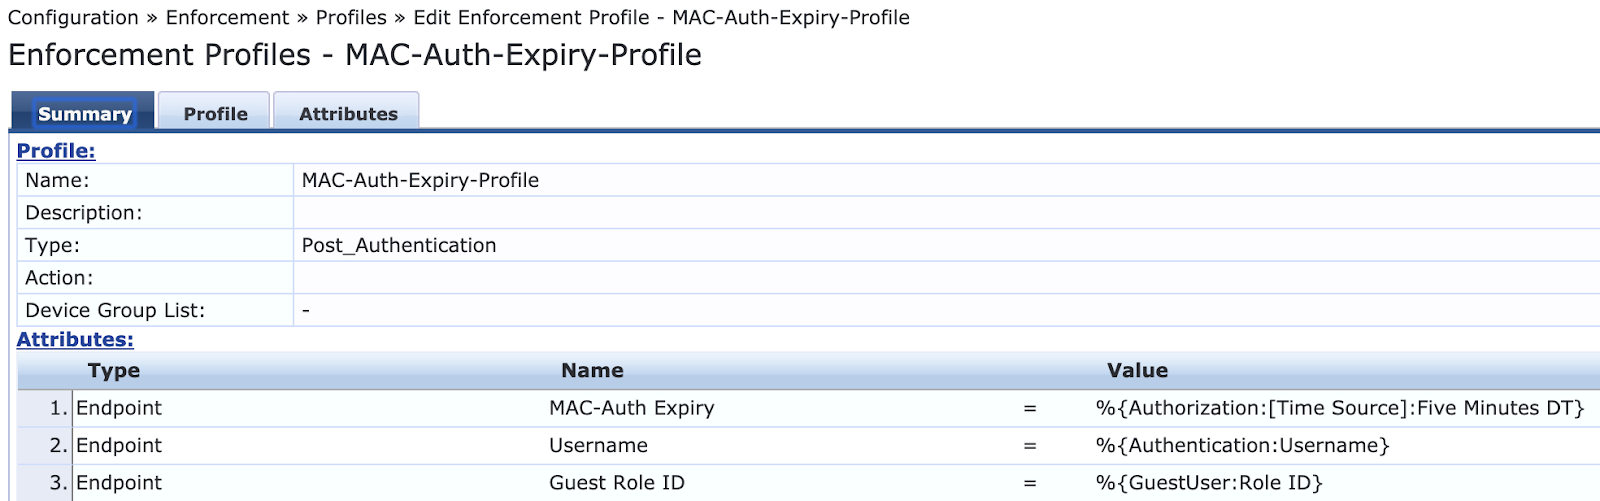
MAC-Auth-Expiry Profile: This profile attaches a MAC Auth Expiry timer to all the MAC addresses which would allow them to continue to access the internet without logging into Captive Portal again during that period of time. The MAC-Auth Expiry Attribute needs to be configured in Time Source prior (steps shown later):
Below is the Enforcement Policy Tab settings:
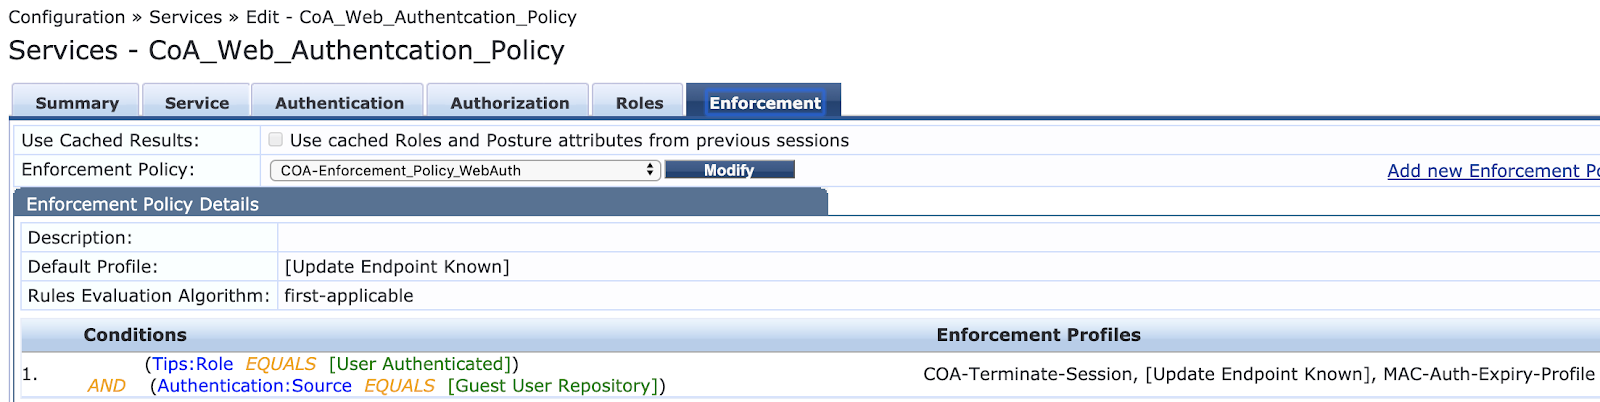
As seen in the above settings page, if the role is [User Authenticated] and if the Authentication Source is [Guest User Repository] then we assign all the profiles defined earlier. [User Authenticated] role is a default role that ClearPass uses and assigns to a Guest User on Successful Web Authentication.
Time Source Settings for MAC Auth Expiry: As mentioned earlier, there are a couple of dependencies for MAC Auth Expiry to work and get applied for the Endpoints that successfully authenticate to the Guest SSID. As configured in MAC auth Policy condition we make use of “Now DT” as reference and if the current login time for the Guest User is less than “Now DT”, then only we send Radius MAC Auth Reject; using which AP applies the default SSID profile to the Guest User which allows internet. “DT” here stands for Date-Time Format. In order to achieve what is explained here we need to modify the Authentication Source “Time Source” as below:
Navigate to Configuration > Authentication > Sources > [Time Source] > Attributes Tab > Edit Date Time Attribute as shown below:
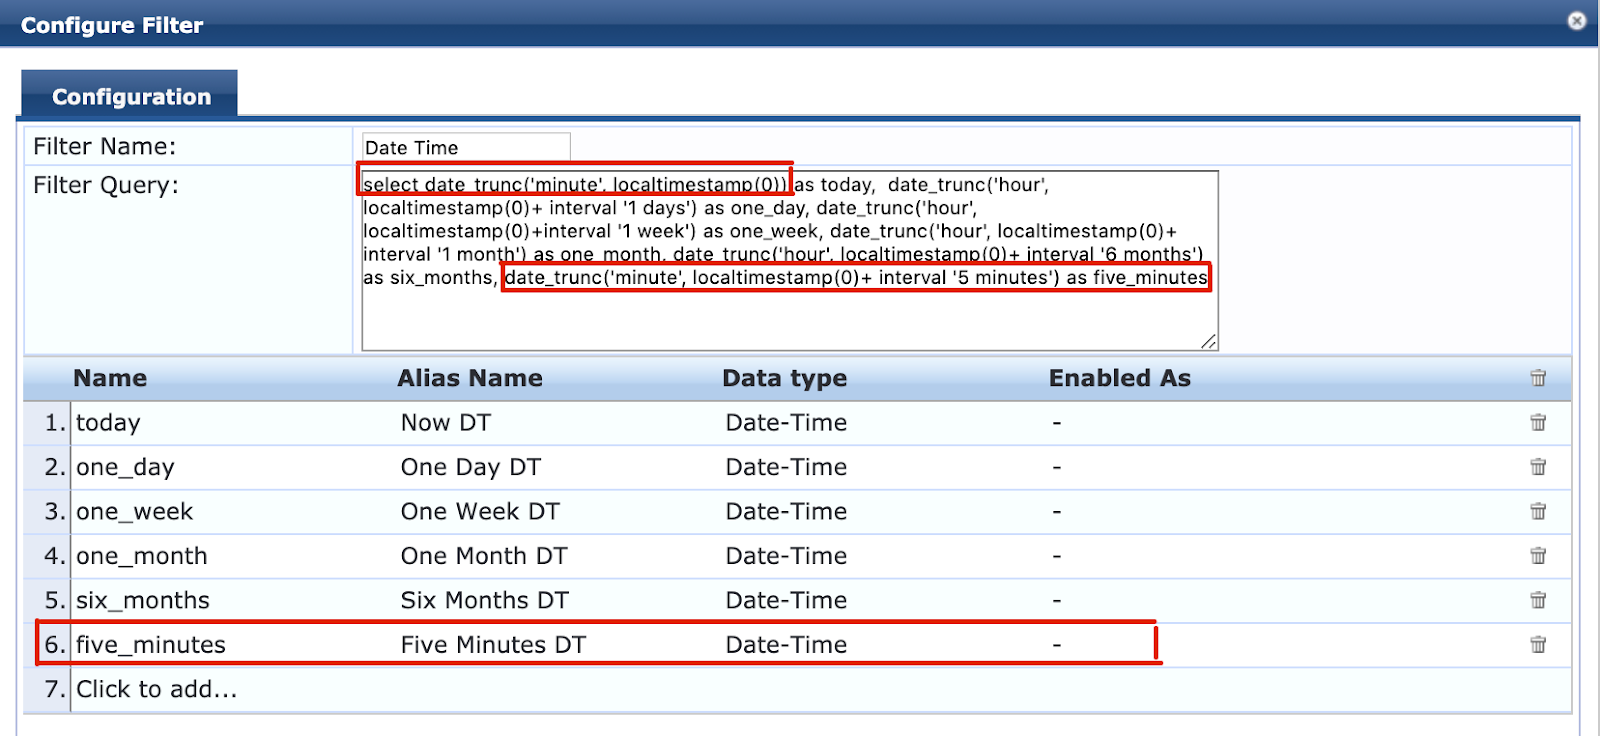
As shown above, the first red box will have ‘hour’ instead of ‘minute’. Change the same to ‘minute’ as shown. This specifies that the MAC Auth Expiry timer will be precise to the level of minutes. On not doing this change, the MAC Auth Expiry timer will only be affected with respect to ‘hour’. Further, for this example we have set the MAC Auth Expiry timer for 5 minutes. This is as shown in above red boxes 2 and 3. The value in 2nd box needs to be copy pasted in the same way if we want to change the configuration to something else and accordingly a new Attribute needs to be created as shown in box 3.
ClearPass Web Login Page Configuration: The important part of this workflow is Captive portal. In our case, ClearPass itself is the Web Server which will host the captive Portal Page. As an example to understand this workflow, ClearPass is configured with basic default page which asks for login credentials. Once the credentials are provided and accepted by ClearPass, a 5 seconds delay timer kicks in and the Guest user is redirected to “arista.com” website. Below are the configuration steps:
- Open ClearPass guest module: https://<clearpass management IP>/guest. OR you can directly select the “ClearPass Guest” tile from the ClearPass management page.
- Expand Configuration and navigate to Pages > Web Logins > Create a new web login page.
- Edit name and page name. Select vendor settings as “Aruba Networks” and Login method as “Server-initiated – Change of authorization (RFC 3576) sent to controller”

- Security Hash setting in Page Redirect should be: “Do not check – login will always be permitted”

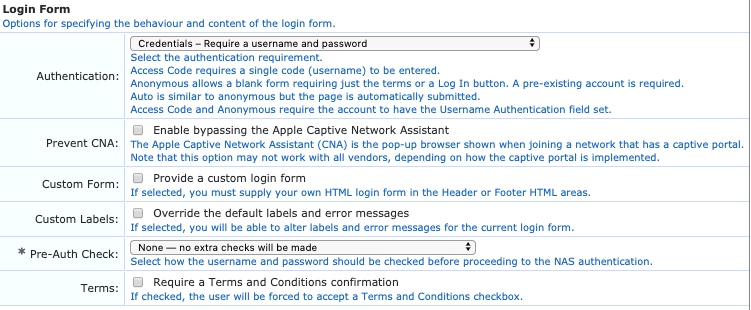
- In Login Form section select Authentication as “Credentials – Require a username and password”. Pre-Auth Check should be set to to “None – no extra checks will be made”. Terms needs to be checked in case a Terms and Conditions confirmation needs to be sent along with captive portal page.
- For this example default destination set.

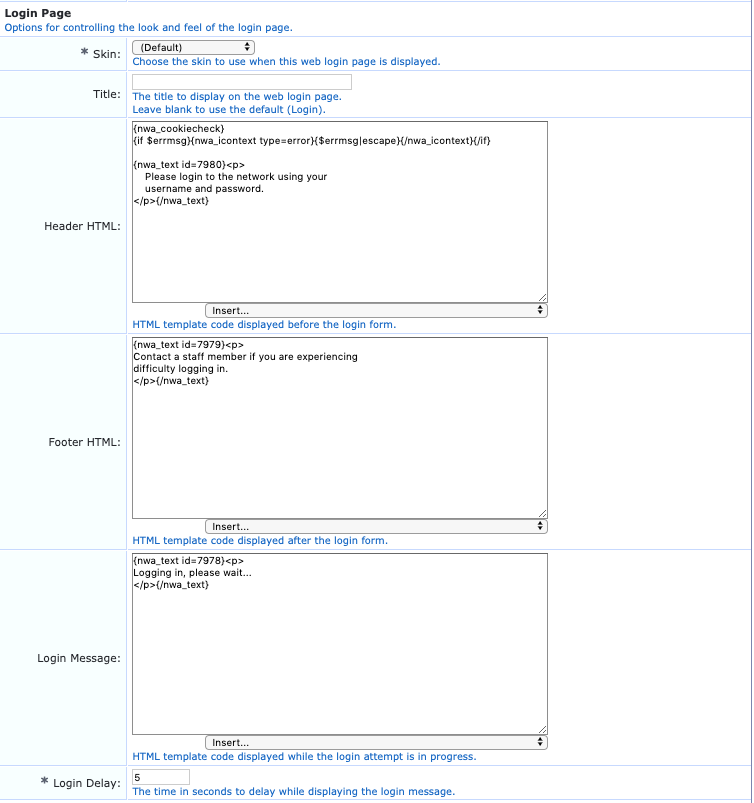
- Leave everything to default settings except the Login Delay time to 5 seconds in the login page section. This can be edited if there is a requirement of a different login page with different HTML templates.
- Everything else can be left blank OR can also be changed as per requirements. Save the changes made to the page. Your login page with the name provided will be listed in Web Logins Window. Select the same and click on Test.

- A new window will open with the login page with the newly configured URL.
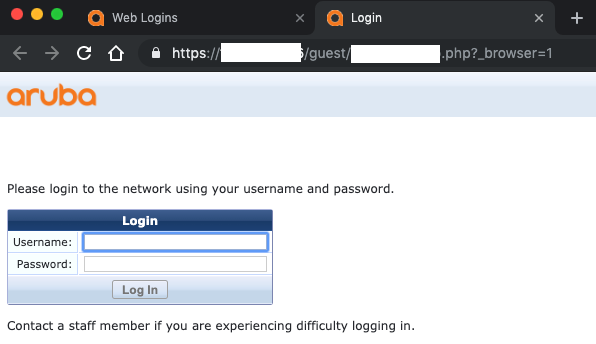
The redirect URL will be something like “https://<ClearPass Server IP>/guest/<name of the Web Login Page>.php?_browser=1”. This link can be used as Redirect Link in Role configuration as mentioned in Arista AP configuration section. Make sure to remove “?_browser=1” from the redirect link as this part of the link is not needed.
ClearPass and Arista AP Wireshark Analysis (RADIUS Communication) as per Workflow
If we collect the radius captures from the ClearPass Server, we would see the below RADIUS packets. The same Radius packets will be seen from the Uplink Captures of the Arista AP as well:

As seen in the capture, the IP ending with 36 is the Arista AP IP and the IP ending with 136 is the ClearPass Server IP. In a working environment we would notice the below flow of packet captures:
- As soon as the 802.11 Authentication is done, Arista AP sends a Radius Access-request message. This request will contain the MAC Address of the Guest user as Username and Password.
- In response to the Access Request, Radius Access-Accept message is sent. This will notify the Arista AP that the MAC authentication is successful and to provide the Guest User with Guest Role which have Captive Portal redirect link configured. Make a note that there will always be a Radius Access-Accept sent on the first request. This is because we have Allow All MAC auth configured in ClearPass Server.
- Captive Portal (HTTP or HTTPS) communication is followed by Radius Accept message. In this context only Radius Communication is explained.
- After step 12 in the above Work Flow, a Radius Disconnect Session Request using CoA is sent to the Arista AP. Arista AP would then adhere the request and send a Deauth to the Guest User.
- Radius Disconnect Session Ack is sent back to the ClearPass Server.
- Guest User repeats the 802.11 Authentication. Arista AP sends a radius Access Request again to the ClearPass server.
- ClearPass verifies that this is a “known” MAC and sends a Radius Reject. This will notify the Arista AP that the client has successfully completed the Captive Portal Authentication and is within the MAC Auth Expiry timer to Access Internet.
Access Tracker flow of Messages for a Successful Authentication:

As seen above, First message is MAC Auth Accept, followed up Web Auth Accept and finally MAC Auth Reject.
Points to Note in this Work Flow
- I like to call this a twisted workflow because Access Reject actually provides internet Access to the Guest User, while Radius Access Accept keeps the Guest User in Un-Authenticated Role which prompts the user complete Captive Portal Authentication.
- As per Aruba TAC, there is a database called “Battery Database” in ClearPass using which it does a Successful CoA. If at all there is any MAC Address (Wi-Fi Client) which is not available in ClearPass Battery Database; the ClearPass “may” not send a successful CoA message for that particular Client if the First message sent by ClearPass is Radius Reject. Hence to overcome this limitation Point 1 in place and ClearPass always sends Radius Accept by default and Reject for a successful Authentication.
- Arista AP supports only Either Pre-Auth or Post-Auth Role (checked in version 8.7.11). Hence to Accommodate point 2, we are doing point 1.
- Arista AP only supports NAS ID (Identifier) for CoA to apply successfully as of today (version 8.7.11).
- By Default Arista AP doesn’t send MAC Address as Password in Access Request to ClearPass Server and ClearPass cannot perform MAC Authentication without a Password. Verify “Radius Settings in SSID Profile” in Arista AP config section.
- CoA needs to be checked in ClearPass Devices Configuration. “Devices and Device Group Config” in ClearPass Config.
- Further restrictions can be added for Guest in SSID Configuration in Firewall settings of Arista AP if not using a different VLAN to segregate Guest traffic.

One thought on “Guest user-auth with ClearPass and Arista APs – Using CoA”